How to Set Up Game Streaming on PC for Beginners
Table of Contents
Picture this: you just pulled off the most clutch play of your gaming life. Your heart is pounding, your teammates are going wild — and nobody saw it. That moment right there is exactly why millions of gamers have made the leap to live streaming. The good news is that learning how to set up game streaming on PC is far more accessible than it looks from the outside. You don’t need a Hollywood production budget or a computer science degree. You need the right tools, the right settings, and this guide.
What Is Game Streaming and Why Should You Start?
Game streaming means broadcasting your gameplay live to an online audience through platforms like Twitch, YouTube Live, or Facebook Gaming. It’s not just for professional esports players anymore. In 2023, Twitch alone averaged over 2.5 million concurrent viewers daily, according to StreamElements — and the vast majority of successful streamers started exactly where you are right now: wondering how to begin.
People stream for different reasons — community connection, career building, creative expression, or simply the thrill of sharing something you love with others who feel the same. Whatever your reason, the setup process is essentially the same, and once it clicks, you’ll wonder why you waited so long.
What You Need Before You Set Up Game Streaming on PC
Hardware Requirements
You don’t need to upgrade your entire rig to start streaming, but your hardware does need to meet some baseline requirements. Here’s what works at different budget levels:
| Component | Minimum | Recommended |
|---|---|---|
| CPU | Intel i5 / Ryzen 5 | Intel i7 / Ryzen 7 |
| RAM | 8 GB | 16 GB |
| GPU | GTX 1060 | RTX 3070+ |
| Upload Speed | 5 Mbps | 10–20 Mbps |
| Microphone | Basic USB mic | Condenser mic |
| Webcam | 720p | 1080p 60fps |
Your internet upload speed is arguably more important than your GPU when it comes to stream quality. If you’re on a slower connection, lowering your resolution and bitrate will give you a smoother stream than squeezing high settings through a bottlenecked connection.
Software Requirements
For how to set up game streaming on PC, you have several solid software options:
- OBS Studio — Free, open-source, and the gold standard for beginners and pros alike
- Streamlabs OBS — Built on OBS with a friendlier interface and built-in alerts
- XSplit — Feature-rich paid option with professional-grade tools
This guide focuses on OBS Studio since it’s free, endlessly customizable, and what most established streamers use.
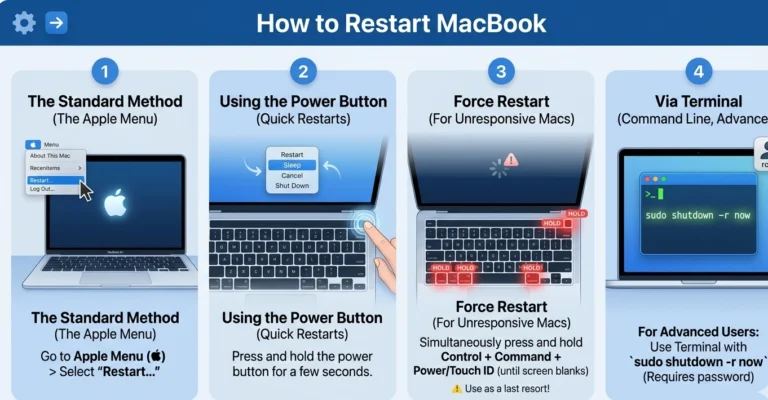
Step-by-Step: How to Set Up Game Streaming on PC with OBS Studio
Step 1 — Download and Install OBS Studio on Your PC
Head to obsproject.com and download the version for your operating system. Installation is straightforward — run the installer, accept the defaults, and launch the application. The auto-configuration wizard that opens on first launch will actually detect your hardware and suggest initial settings, which is a great starting point.
Step 2 — Connect Your Streaming Platform Account
Every streaming platform gives you a unique stream key — a private code that tells OBS where to send your broadcast. To find yours on Twitch, go to your Creator Dashboard → Settings → Stream. Copy that key, then in OBS go to Settings → Stream, select Twitch as your service, and paste it in. Never share your stream key publicly — anyone with it can stream to your channel.
Step 3 — Configure Your Stream Settings
This step confuses many beginners. The goal is to find the sweet spot between quality and stability given your hardware and internet speed.
| Resolution | Bitrate | FPS | Best For |
|---|---|---|---|
| 1080p | 6,000 kbps | 60 | High-end PC |
| 720p | 3,500 kbps | 60 | Mid-range PC |
| 720p | 2,500 kbps | 30 | Entry-level PC |
In OBS, go to Settings → Output → Streaming and set your bitrate. Under Video, set your base and output resolution. If your GPU supports it, select NVENC (NVIDIA) or AMD VCE as your encoder — these offload encoding work from your CPU, keeping your game performance intact.
Step 4 — Set Up Scenes and Sources
OBS works with a scene-based system. Think of each scene as a different “view” — your main gameplay scene, a starting-soon screen, a break screen, and so on.
Within each scene, you add sources:
- Game Capture — captures your game window specifically
- Video Capture Device — adds your webcam feed
- Audio Input Capture — adds your microphone
- Image or Browser Source — for overlays, alerts, or donation tickers
Arrange these sources in your scene preview, resize them to your preference, and you’ve built your stream layout.
Step 5 — Test Everything Before Going Live
Before your first real broadcast, use OBS‘s Record function to record a few minutes of gameplay. Review the footage for audio sync issues, frame drops, or visual glitches. Better to catch problems privately than in front of an audience.
Step 6 — Go Live
When you’re ready, click Start Streaming in OBS. Before you do, make sure you’ve set your stream title, selected the correct game category on your platform, and added relevant tags to help new viewers find you.
Tips to Improve Your Game Stream Quality
- Use a wired Ethernet connection — Wi-Fi introduces latency and packet loss that degrades stream stability
- Enable noise suppression on your microphone source in OBS (Filters → Noise Suppression)
- Keep background apps closed — Chrome tabs and Discord video can eat into your encoding performance
- Engage with your chat — viewers stay longer when the streamer acknowledges them
- Consider a Stream Deck once you’re comfortable — it makes scene switching effortless
Common Mistakes Beginners Make
Learning how to set up game streaming on PC is one thing — avoiding rookie mistakes is another. The most common pitfalls include streaming at a bitrate your internet can’t handle (causing buffering for viewers), neglecting audio quality (the number one reason viewers leave), and ignoring stream titles and tags (which are your primary discovery tools on every platform).
Conclusion
Setting up game streaming on PC is genuinely one of those things that feels intimidating until you actually do it — and then it becomes second nature. OBS Studio gives you everything you need for free, and with the settings in this guide, you can be live within an hour of reading this. Start simple, stay consistent, and let your personality carry the stream. The audience will follow.
FAQ
Q: What is the best free software to set up game streaming on PC? OBS Studio is the top recommendation for anyone learning how to set up game streaming on PC. It’s free, open-source, and used by both beginners and professional streamers worldwide.
Q: How much internet speed do I need to set up game streaming on PC? A minimum upload speed of 5 Mbps will work for 720p streaming, but 10–20 Mbps is recommended if you want to stream at 1080p 60fps without buffering issues.
Q: Can I set up game streaming on PC without a powerful GPU? Yes. By lowering your resolution to 720p and your frame rate to 30fps, mid-range and even entry-level hardware can handle streaming without crashing your game performance.
Q: How do I set up game streaming on PC for Twitch specifically? In OBS, go to Settings → Stream, select Twitch as your platform, and paste in your stream key from your Twitch Creator Dashboard. Everything else follows the same setup process described in this guide.
Q: Is it free to set up game streaming on PC? Completely. OBS Studio is free, and platforms like Twitch and YouTube Live charge nothing to broadcast. Your only costs are optional — better microphones, webcams, or subscriptions to overlay services.
Ready to go live? Drop a comment below with your streaming platform or share this guide with a fellow gamer who’s been thinking about making the leap.