How to Build a PC Step-by-Step: The Ultimate Beginner Guide
Table of Contents
Remember the first time you cracked open a box full of PC components — cables coiled like snakes, screws in five different sizes, and a motherboard that looked like a miniature city? That moment of pure overwhelm is something almost every builder has felt. Maybe you’ve been watching YouTube builds for months, pricing out parts on PCPartPicker late at night, wondering if you’re actually capable of pulling this off.
Here’s what nobody tells you upfront: building your own PC is one of the most rewarding things you can do as a tech enthusiast — and it’s far more achievable than the internet makes it look. This guide walks you through exactly how to build a PC, from picking your parts to the first glorious boot screen, in plain language anyone can follow.
Why Build a PC Instead of Buying One?
Before you touch a single screw, it helps to understand why this effort pays off.
When you buy a pre-built PC, you’re paying a premium for labor, branding, and components the manufacturer chose — not necessarily what’s best for your use case. When you build your own, every dollar goes directly toward performance.
| Option | Avg. Cost | Performance | Customization |
|---|---|---|---|
| Pre-built PC | $800–$1,500 | Moderate | Low |
| Custom-built PC | $600–$1,200 | High | Full |
| Gaming Laptop | $900–$1,800 | Moderate | None |
Beyond the savings, you also gain a deep understanding of your machine. When something goes wrong two years down the line — and at some point, something always does — you’ll know exactly where to look.
What You Need Before You Start
Tools Checklist
You don’t need a workshop. Just gather these basics before you begin:
- ✅ Phillips-head screwdriver (#2)
- ✅ Anti-static wrist strap (or regularly touch a grounded metal surface)
- ✅ Zip ties for cable management
- ✅ Thermal paste (many coolers include it pre-applied)
- ✅ A well-lit, flat, non-carpeted workspace
- ✅ Magnetic parts tray to keep screws from vanishing
Keep your motherboard manual nearby throughout the entire build. It’s the single most useful document you’ll reference, and most people ignore it entirely.
Understanding Your PC Parts
The Core Components You Need
1. CPU (Processor)
Your CPU is the brain of the operation. For beginners in 2026, the AMD Ryzen 5 7600 and Intel Core i5-13400 are both excellent starting points — strong performance without overpaying.
2. Motherboard
Your motherboard ties everything together. The socket type must match your CPU — this is non-negotiable. Choose from ATX (full-size), Micro-ATX, or Mini-ITX depending on your case and expansion needs.
3. RAM
Go with at least 16GB for general use and gaming. Make sure it matches your board’s supported standard — DDR4 or DDR5.
4. Storage
Here’s how the main options compare:
| Storage Type | Speed | Price/GB | Best For |
|---|---|---|---|
| NVMe SSD | ~3,500 MB/s | $$$ | OS + Games |
| SATA SSD | ~550 MB/s | $$ | General Use |
| HDD | ~150 MB/s | $ | Mass Storage |
A 1TB NVMe SSD is the sweet spot for most builds — fast, affordable, and plenty of room.
5. GPU (Graphics Card)
For gaming builds, your GPU is the most important component. Whether you go NVIDIA or AMD depends on your budget and the types of games you play. Don’t cheap out here — a balanced build prioritizes GPU headroom.
6. PSU (Power Supply)
A low-quality PSU is the one component that can take down your entire system. Always buy from reputable brands and aim for 80+ Gold efficiency or higher. Use an online wattage calculator to determine your needs, then add a 20% buffer.
7. Case
Your case needs to accommodate your motherboard’s form factor and leave room for airflow. Mid-tower ATX cases are the most beginner-friendly.
8. CPU Cooler
Stock coolers work, but an aftermarket air cooler delivers noticeably better temperatures. AIO liquid coolers are excellent for performance but add complexity.
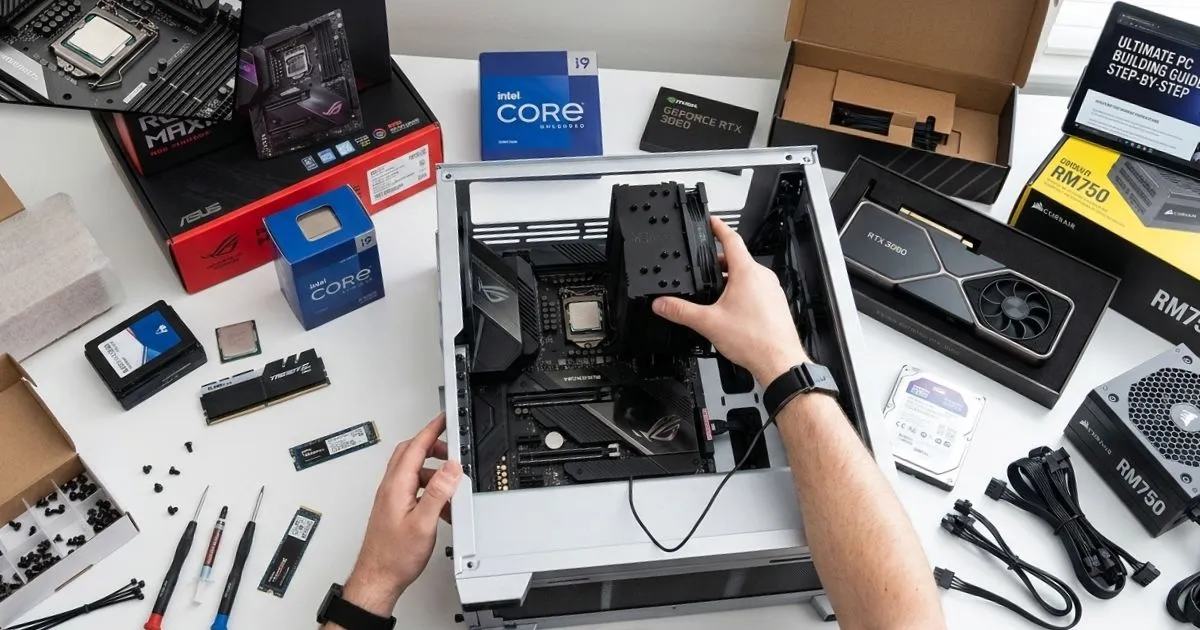
How to Build a PC — Step-by-Step Assembly
This is the heart of what you came for. Take your time with each step — rushing is how mistakes happen.
Step 1 — Install the CPU
Open the motherboard socket lever, align the CPU using the golden triangle marker in the corner, and gently lower it into place. Never press or force it. Close the lever, and you’re done.
Step 2 — Install RAM
Slot your RAM sticks into the correct channels — check your manual, but it’s usually A2 and B2 for dual-channel configuration. Press firmly until both clips click.
Step 3 — Install the M.2 SSD
Slide the SSD in at a 30-degree angle, press it flat, and secure it with the small retention screw. This takes about 60 seconds and dramatically impacts how fast your system boots.
Step 4 — Apply Thermal Paste & Mount the Cooler
Set the audio format to 24-bit, 96,000 Hz (Studio Quality). Mount your cooler according to its bracket style, and connect the fan header to the motherboard’s CPU_FAN port.
Step 5 — Prepare the Case
Remove both side panels. Install the I/O shield into the rear cutout (it clicks in firmly). Then install motherboard standoffs in the correct positions — these small brass risers keep your motherboard from short-circuiting against the case.
Step 6 — Seat the Motherboard
Lower the motherboard into the case, align the I/O ports with the shield, and screw it in at all mounting points. Don’t overtighten — snug is enough.
Step 7 — Install the PSU
Mount the PSU in its designated bay. Run the 24-pin ATX cable and the 8-pin CPU power cable — these two connections are the most critical in the build.
Step 8 — Install the GPU
Remove the appropriate PCIe slot covers from the rear of the case. Press the GPU firmly into the top PCIe x16 slot until it clicks, then connect your PCIe power cables from the PSU.
Step 9 — Connect Case Cables
This is the fiddliest part. Connect the front panel headers — power button, reset button, and LEDs — to the correct pins on your motherboard. Refer to your manual here, because pin layouts vary by brand.
Step 10 — Cable Management
Route cables behind the motherboard tray whenever possible to keep the build clean and organized. Bundle them with zip ties. Good airflow isn’t just aesthetic — it keeps your components cooler and your system quieter over time.
Step 11 — First Boot
Before you power on, do a final check: all power connectors seated, GPU locked in, RAM clicked down, no loose cables near fans. Connect your monitor, keyboard, and mouse. Press the power button.
If your screen lights up with a POST message or the BIOS — you’ve done it. That feeling? It doesn’t get old.
Installing Windows 11
Once your system POSTs successfully, it’s time to load an operating system.
- On another PC, download the Windows 11 ISO from Microsoft’s official site
- Use Rufus to flash it onto a USB drive (8GB minimum)
- Plug the USB into your new build and boot from it
- In BIOS, set your boot priority to the USB drive and enable XMP/EXPO to run your RAM at its rated speed
- Follow the Windows installation prompts — choose your drive, set up your account, and let it run
After the Build — Critical Next Steps
Install Your Drivers
- GPU drivers from NVIDIA or AMD’s website
- Chipset drivers from your motherboard manufacturer
- Audio drivers if sound isn’t working out of the box
Check Your Temperatures
| Component | Safe Idle | Safe Load | Warning Zone |
|---|---|---|---|
| CPU | 30–45°C | 65–85°C | 90°C+ |
| GPU | 30–50°C | 70–85°C | 90°C+ |
| NVMe SSD | 30–40°C | 50–70°C | 80°C+ |
Use HWiNFO64 to monitor temps in real time. Run a stress test with Cinebench R23 or 3DMark to confirm your system is stable under load.
Troubleshooting Common Problems
- PC won’t turn on: Check the 24-pin and 8-pin power connectors. Verify the front panel power switch header is plugged into the correct pins.
- No display: Reseat the GPU. If your CPU has integrated graphics, try connecting the monitor directly to the motherboard.
- No POST: Reseat RAM or try one stick at a time. Clear the CMOS using the jumper or button on your motherboard.
- Overheating: Verify your cooler is properly seated and thermal paste is applied. Check that case fans are spinning and airflow isn’t blocked.
FAQ: How to Build a PC
Q: How long does it take to build a PC as a beginner? Most first-time builders finish in 3–6 hours. Don’t rush — take breaks, re-read steps, and double-check connections.
Q: Is building a PC cheaper than buying pre-built? In most cases, yes. You can save 20–40% compared to a pre-built with equivalent specs, especially at the mid-range.
Q: Do I need experience to build a PC? None at all. If you can follow instructions and handle small screws without panicking, you have everything it takes.
Q: Can I build a PC without a GPU? Yes — if you’re using a CPU with integrated graphics (like Intel Core CPUs with iGPU or AMD Ryzen APUs), you can run a display without a dedicated card.
Q: How do I know my parts are compatible? Use PCPartPicker.com — it flags incompatibilities automatically and even estimates total wattage draw.
Q: How do I build a PC on a $500 budget? Prioritize a used GPU (RX 6600 or RTX 3060), pair it with a Ryzen 5 5600, 16GB DDR4 RAM, and a 500GB NVMe SSD. It performs far better than its price suggests.
You Built a PC — Now What?
Learning how to build a PC isn’t just a one-time project — it’s the start of a relationship with a machine that grows with you. Upgrade your GPU next year. Add storage when you need it. Swap in a better cooler when you’re ready to push performance further.
Your next step: Share your build in a PC building community, post your specs, ask questions, and help the next beginner who’s standing where you stood at the beginning of this article — staring at a pile of parts, wondering if they can actually pull this off.
They can. And so could you. 🖥️