How to Make Bread on Minecraft PC – Essential Crafting Guide
Table of Contents
You remember your first night in Minecraft. The sun dropped fast, mobs started crawling out of the shadows, and your hunger bar was already ticking down like a countdown to disaster. Someone in a forum, a YouTube comment, or maybe just your own instinct pointed you toward one thing: make bread.
That advice saved your game. And if you’re here right now, it’s about to save yours too.
Bread is not the flashiest food in Minecraft. It won’t give you special buffs, it won’t glow, and it certainly won’t impress anyone at the end-game stage. But when you’re three days into survival mode with nothing but dirt, seeds, and sheer determination — bread is everything. It’s accessible, it’s renewable, and it’s yours to make in under two minutes once you know exactly what to do.
This guide walks you through every single step of making bread on Minecraft PC. From planting your first wheat seeds to running a fully automated farm that feeds you indefinitely, you’ll leave here knowing more than most players ever bother to learn about this humble but essential crafting recipe.
Let’s get into it.
Why Bread Is the Best Early-Game Food in Minecraft PC
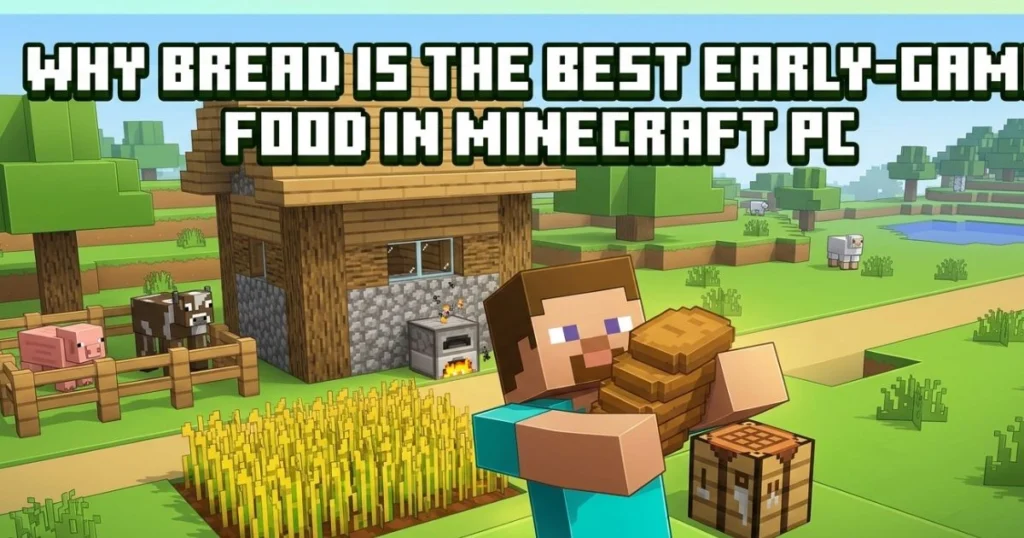
Before you even think about hunting animals or searching for more exotic food sources, bread should be your first priority in survival mode. Here’s why it earns that spot.
When you eat bread in Minecraft, it restores 5 hunger points, which equals 2.5 hunger icons on your screen. That’s a solid return for something that costs you nothing but three pieces of wheat and a few minutes of farming. Compared to raw meat — which carries the risk of food poisoning — bread is clean, reliable, and immediately effective.
What really sets bread apart from other early-game options is that you don’t need a furnace. No smelting, no fuel, no waiting. You take your wheat, you open your crafting table, you place it in the right pattern, and you eat. That simplicity is a serious advantage when you’re still building your first shelter and resources are stretched thin.
It’s also worth noting that wheat farming is completely renewable. Once you set up even a small farm, you have a near-infinite food supply that resets every few in-game days. No mob hunting required, no luck involved — just consistent, predictable harvests.
| Food Item | Hunger Restored | Requires Cooking? | Early Game Friendly? |
|---|---|---|---|
| Bread | 5 points | No | ✅ Yes |
| Raw Beef | 3 points | No | ⚠️ Partial |
| Cooked Steak | 8 points | Yes | ❌ Not early |
| Apple | 4 points | No | ✅ Yes |
| Golden Carrot | 6 points | No | ❌ Hard to get |
The table above makes it clear. Bread sits in a unique position — no cooking required, solid hunger restoration, and available from day one. It’s not the best food in the game by end-game standards, but for where you are right now, it’s exactly what you need.
What You Need to Make Bread on Minecraft PC – Ingredients and Tools
One of the best things about the bread recipe is how short the ingredient list is. There’s no secondary item, no rare drop, no obscure crafting component. You need two things to make bread: wheat and a crafting table. That’s it.
The Required Ingredients
| Ingredient | Quantity | Where to Find It |
|---|---|---|
| Wheat | 3 | Grown from seeds, found in villages |
| Crafting Table | 1 | Crafted from 4 wooden planks |
Three pieces of wheat, all placed in a row. Nothing more. If you have those three items and access to a crafting table, you’re already seconds away from your first loaf.
Tools That Make the Process Easier
While not strictly required to craft the bread itself, a few tools will make your wheat-gathering process significantly smoother:
- Hoe — You need this to till soil before planting seeds. A wooden hoe is perfectly fine and costs almost nothing to make.
- Water source nearby — Farmland within four blocks of water stays hydrated, which means your wheat grows at full speed. Dry farmland reverts to dirt and kills your crops.
- Crafting Table — This one is non-negotiable. Your personal 2×2 inventory crafting grid cannot produce bread. You absolutely need the full 3×3 crafting table grid.
Optional Tools Worth Having
- Bone Meal — Right-clicking bone meal on wheat instantly advances its growth by several stages. Great for rushing your first harvest.
- Fortune III Hoe — The Fortune enchantment increases the number of seeds you get per wheat block, which means faster farm expansion.
- Fences or walls — Mobs will trample your crops if they walk over them. A simple fence around your farm prevents a lot of unnecessary frustration.
How to Get Wheat in Minecraft PC – Three Reliable Methods
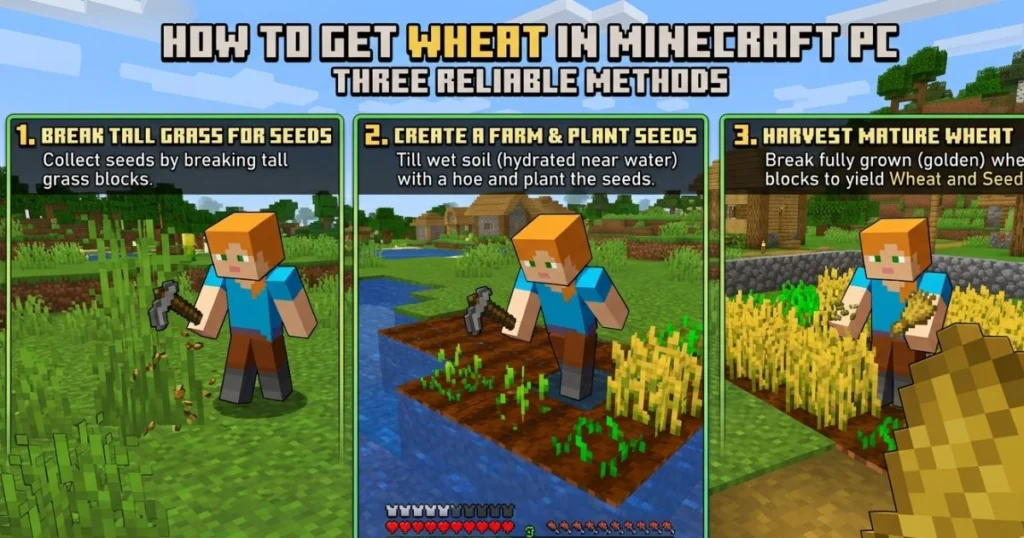
Wheat is the only ingredient you need, so knowing how to get it consistently is the real skill behind bread-making. You have three main paths here.
Method 1 – Grow Your Own Wheat Farm
This is the method you’ll rely on long-term, and it’s simpler than it sounds. Follow these steps:
- Craft a hoe using 2 sticks and 2 planks, cobblestone, iron, gold, or diamond
- Find a flat area with dirt or grass blocks close to a water source
- Right-click the ground with your hoe to till the soil — it turns darker and slightly textured
- Break nearby tall grass to collect wheat seeds, then right-click the tilled soil to plant them
- Wait for the wheat to grow through 8 stages — it starts pale green and turns golden when fully mature
- Harvest only when the wheat is fully golden — stage 8 — or use bone meal to fast-track the process
- Replant immediately — always keep a few seeds back so your farm regenerates automatically
Your first harvest may feel small, but wheat farming scales fast. Double your farm size after the first harvest, and within a few cycles you’ll have more bread than you can eat.
Method 2 – Find Wheat in Villages
If you happen to spawn close to a village—which is common in many Minecraft PC seeds—you’re off to a great start. Village farms naturally generate with fully grown wheat, carrots, potatoes, and beetroot. Walk up to the wheat, break the blocks, and you’ll collect both wheat and seeds without growing a single thing yourself.
This is the fastest route to your first loaves of bread. No farming, no waiting — just locate the village, find the farm plots (usually near the center of the village), and harvest. Respect the villagers while you’re at it; they don’t fight back, but repeatedly raiding their farms feels a bit ruthless.
Method 3 – Loot Chests
Chests scattered throughout the world sometimes contain wheat directly — or even pre-crafted bread. Here’s what you can expect from different locations:
- Village house chests — up to 3 bread loaves
- Mineshaft chests — up to 3 bread loaves
- Dungeon chests — up to 1 bread loaf
- Stronghold library chests — bread occasionally present
If you’re exploring early on and stumble across one of these locations, always check the chests before moving on. Finding three loaves of bread in a dungeon chest can carry you through an entire early-game phase without needing to farm at all.
How to Make Bread on Minecraft PC – The Exact Crafting Recipe
You’ve got your wheat. Now it’s time to actually craft the bread. This part takes about ten seconds once you know the pattern — but get the placement wrong and nothing happens.
Step 1 – Place Your Crafting Table
If you don’t have one in your inventory yet, craft it from your personal inventory grid. Collect four wood logs, convert them to planks, and arrange all four planks in the 2×2 grid. Place the crafting table on any surface by right-clicking.
Step 2 – Open the Crafting Table
Walk up to your placed crafting table and right-click it. This opens the full 3×3 crafting grid on your PC screen.
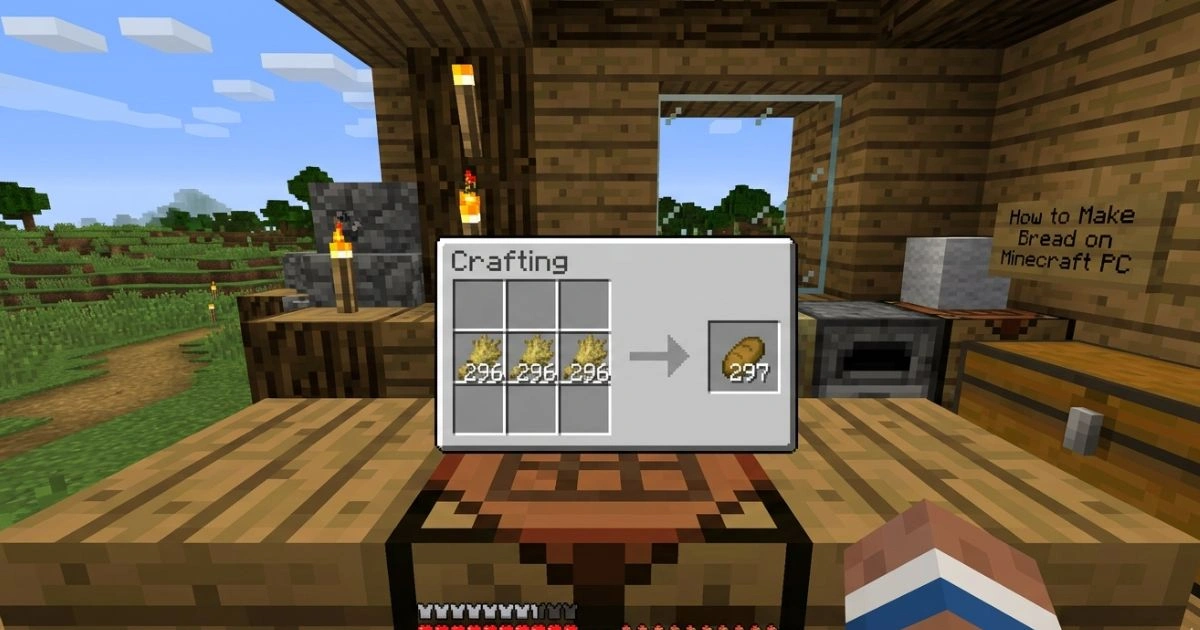
Step 3 – Place Wheat in the Correct Pattern
Here is exactly where your wheat needs to go:
| Crafting Grid | Column 1 | Column 2 | Column 3 |
|---|---|---|---|
| Row 1 | ❌ Empty | ❌ Empty | ❌ Empty |
| Row 2 | 🌾 Wheat | 🌾 Wheat | 🌾 Wheat |
| Row 3 | ❌ Empty | ❌ Empty | ❌ Empty |
Fill all three slots in the middle row with wheat. Leave every other slot completely empty. The moment you place the third wheat correctly, bread will appear in the output slot on the right.
Step 4 – Collect Your Bread
Click on the bread in the output slot to move it into your inventory. For maximum efficiency on PC, use Shift + click to collect all bread output at once, which is especially useful when crafting in bulk.
PC-Specific Crafting Tips You Should Know
- Shift + click the output slot to instantly collect all crafted bread in one action
- Hold right-click on a stack of wheat in the grid to distribute it one piece at a time
- Press number keys 1–9 to move bread directly into your hotbar slots
- Press E to open your inventory screen from anywhere and quickly access your crafting table output
How to Mass-Produce Bread in Minecraft PC – Farming at Scale
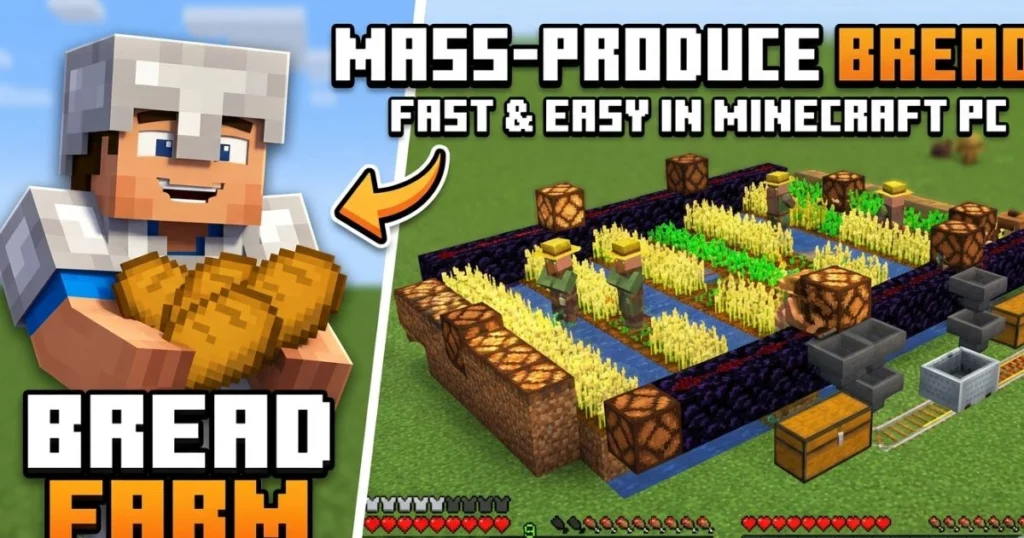
Once you’ve mastered the basic recipe, the next step is making sure you never run out of bread again. That means building a real farm — and eventually, an automatic one.
Building an Efficient Wheat Farm
The gold standard for a small manual wheat farm is a 9×9 layout with a water source block in the center. That single water block hydrates all 80 surrounding farmland blocks within its 4-block radius. The result is a compact, highly efficient farm that produces a significant amount of wheat per cycle.
For even greater output, stack multiple farm layers vertically. Build the same 9×9 layout on platforms two blocks above each other, with water in each center. This multiplies your harvest without taking up extra horizontal space — a key advantage if you’re building in a tight area.
Setting Up an Automatic Wheat Farm
If you want bread production to run while you focus on other tasks, an auto-farm is the answer. Here’s how the basic version works:
- Place observers facing your wheat crops — they detect when the wheat reaches full growth
- Connect the observers to dispensers loaded with water buckets, positioned to flood the crop rows on signal
- The water pushes harvested wheat and seeds into a hopper system below the farm
- Hoppers feed directly into chests, creating a fully passive collection system
Every time your wheat finishes growing, the observer triggers the dispenser, the water washes the crops, and everything lands in your chest. You don’t have to touch it. Come back after building your house, mining ores, or exploring — your bread supply will be waiting.
Using Villager Trades for Wheat and Bread
Farmer villagers interact with wheat in two useful ways:
- They will buy wheat from you — typically around 20 wheat for 1 emerald
- They will sell bread — usually 6 loaves for 1 emerald
If you have surplus wheat beyond what you need for bread, trading with farmer villagers is a smart way to convert excess crops into emeralds, which you can then use to buy other valuable items from different villager types.
Common Mistakes When Making Bread on Minecraft PC
Even a recipe this simple has a few places where players go wrong. Here are the most frequent errors and exactly how to fix them.
Using Your Personal Inventory Grid
Your inventory’s built-in 2×2 crafting grid cannot produce bread. The recipe requires a full 3×3 grid, which only the crafting table provides. If you’re placing wheat in your inventory grid and getting nothing back, that’s your problem. Place a crafting table first.
Placing Wheat in the Wrong Pattern
Wheat placed vertically (down a column) or diagonally produces no output. The recipe is strictly horizontal — all three wheat pieces in a single row across the middle. Double-check your placement before assuming something is broken.
Harvesting Wheat Too Early
Wheat harvested before stage 8 drops only seeds — no wheat, no bread. The visual cue you’re looking for is a golden-brown color on the crop. Green or pale wheat is not ready. If you’re impatient, use bone meal to push it to full growth instantly.
Not Replanting After Harvest
Breaking your wheat without immediately replanting is how farms die. Your inventory should always carry a stack of extra seeds so you can replant each tilled block within seconds of harvesting. Make it a habit from the start and you’ll never have a food shortage.
Bread vs. Other Food Sources in Minecraft PC
As your game progresses, you’ll encounter better food options. Here’s how bread stacks up against the competition:
| Food | Hunger Restored | Saturation | Ease of Getting | Best For |
|---|---|---|---|---|
| Bread | 5 | 6 | Very Easy | Early survival |
| Cooked Chicken | 6 | 7.2 | Easy | Mid-game |
| Cooked Steak | 8 | 12.8 | Medium | Late-game |
| Golden Carrot | 6 | 14.4 | Hard | End-game |
| Pumpkin Pie | 8 | 4.8 | Medium | Special use |
Saturation is the hidden stat that determines how long your hunger bar stays full after eating. Bread’s saturation of 6 is decent but not exceptional. This means bread keeps you going but requires more frequent eating compared to steak or golden carrots.
The honest takeaway: bread is a starter food, not a forever food. Use it to carry you through your first week of gameplay, then start transitioning toward cooked meats or golden carrots as your resources grow. Bread never becomes useless — it’s still fast to make and always reliable — but you’ll naturally eat less of it as the game progresses.
Fun Facts About Bread in Minecraft PC
A few things about bread that most players don’t know:
- Bread is one of the original Minecraft food items, introduced all the way back in Beta 1.2 — it’s been part of the game practically since food mechanics existed
- You can throw bread into a composter for a small chance of producing bone meal, which feeds right back into accelerating your wheat farm
- Farmer villagers will sometimes throw bread at you during gameplay if you’re a villager yourself (in certain mechanics), making it one of the few foods that can arrive as a gift
- A fully stocked double chest holds 3,456 loaves of bread — more than enough to survive essentially forever on bread alone
- Bread cannot be used in a furnace for fuel or cooking, which surprises some newer players who try to smelt with it
FAQ – How to Make Bread on Minecraft PC
Q1: How do you make bread on Minecraft PC without a crafting table?
You cannot make bread without a crafting table. The recipe requires a full 3×3 crafting grid, which your personal inventory grid does not provide. Craft a crafting table first using 4 wooden planks.
Q2: How many wheat do you need to make bread in Minecraft PC?
You need exactly 3 wheat, placed horizontally across the middle row of the crafting table grid.
Q3: Can you make bread in Minecraft PC survival mode?
Absolutely — bread is one of the easiest foods to produce in survival mode and is specifically designed to be accessible from the very beginning of the game. It’s a beginner’s best food source.
Q4: Where do I find wheat seeds in Minecraft PC?
Wheat seeds drop from breaking tall grass in the world. You can also find them in village farms, dungeon chests, mineshaft chests, and as drops from fully grown wheat plants when harvested.
Q5: How do I make bread on Minecraft PC fast?
Build a large wheat farm, use bone meal to skip the growing stages, and Shift+click the output slot on your crafting table to collect all bread instantly. With a big enough farm, you can produce dozens of loaves in under a minute.
Q6: Does bread stack in Minecraft PC?
Yes. Bread stacks up to 64 per inventory slot, making it very storage-efficient for carrying large quantities.
Q7: Can I automate bread production in Minecraft PC?
Yes. Using observers, water dispensers, hoppers, and chests, you can build an automatic wheat farm that harvests itself and stores your bread supply passively while you do other things.
Q8: How long does it take for wheat to grow in Minecraft PC?
Wheat growth depends on light levels, hydration, and random tick speed. Under normal settings, fully hydrated wheat in good light takes roughly 50–72 minutes of real time to grow from seed to stage 8, though bone meal eliminates the wait entirely.
Final Thoughts – Start Making Bread and Never Starve Again
At the end of the day, making bread on Minecraft PC comes down to one dead-simple recipe: three wheat, horizontal row, crafting table. That’s it. Ten seconds and you’ve got food that keeps you alive and moving.
But as this guide shows, bread is much more than a quick recipe. It’s the foundation of an entire food system — one that starts with your first scraggly wheat farm and can grow into an automated production line running in the background of your survival world. The skills you build here — farming, resource management, using the crafting table efficiently — carry over into everything else you’ll do in Minecraft.
So here’s your next move: log in, find or build a crafting table, plant your first wheat seeds, and eat your first loaf of Minecraft bread. Once you’ve done that, everything else in this game gets just a little bit easier.
If this guide helped you, share it with a friend who’s just starting out in Minecraft — because everyone deserves to make it through that first night. And if you have questions, tips of your own, or a story about your first Minecraft survival run, drop it in the comments. The community learns best when players share what actually works.
Now go build that farm. 🍞
Continue your Minecraft crafting journey — explore guides on building your first shelter, crafting armor, and setting up your first mine to take your survival game to the next level.