
Minecraft PC How to Make a Crafting Table – Complete Beginner Guide
Table of Contents
You spawned in. Trees everywhere. Maybe a river nearby. The sky is that perfect shade of blue that makes you feel like anything is possible.
Then you notice it — the sun is already moving.
You start punching a tree because someone told you that’s what you do. You get a log. Then another. But then you open your inventory and just… stare. Boxes. A weird little grid. Items you don’t understand yet.
That moment — that slightly panicked, slightly thrilled feeling of not knowing what comes next — is something every Minecraft player remembers. And the thing that saved most of them from their first night of terror? A simple wooden block sitting on the ground.
The crafting table.
If you’re playing Minecraft on PC for the first time, this guide is written specifically for you. Not for veterans. Not for speedrunners. For the person who just wants to figure out how to survive — and actually start enjoying one of the greatest games ever made. By the end of this article, you’ll know exactly how to make a crafting table in Minecraft PC, how to use it, and what to build first. Let’s get into it.
What Is a Crafting Table in Minecraft? (And Why It Changes Everything)
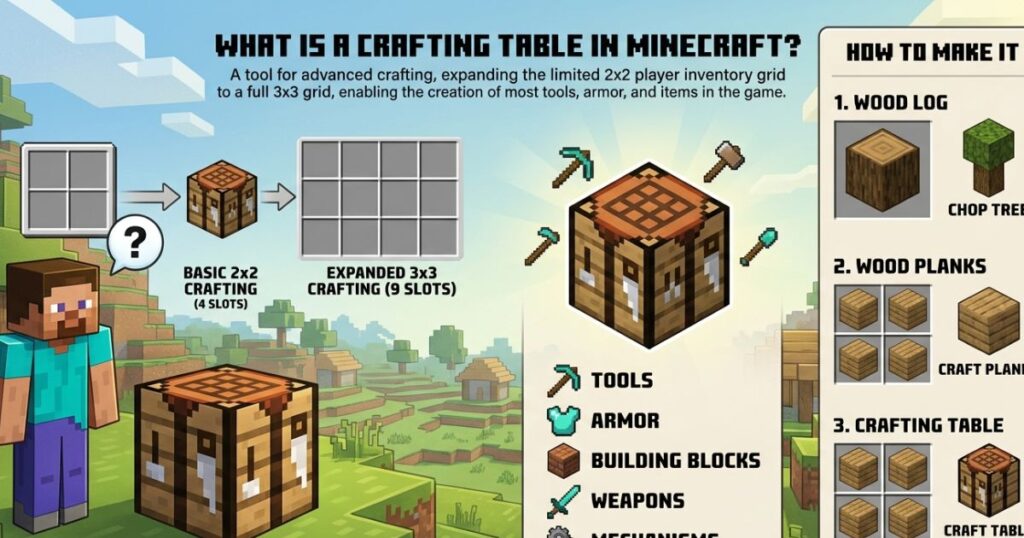
The Basic Definition
Think of your inventory screen as a tiny kitchen counter with barely enough room to make a sandwich. That’s the default 2×2 crafting grid you start with. It lets you make a few basic items — but only a few.
The crafting table expands that into a full 3×3 grid. Nine slots instead of four. And that difference? It unlocks almost the entire game.
Every serious recipe in Minecraft — weapons, tools, armor components, storage, transportation — requires that 3×3 grid. Without it, you’re essentially locked out of the core gameplay loop that makes Minecraft what it is.
Why Beginners Literally Cannot Survive Without It
Here’s a quick reality check. Without a crafting table, you cannot make:
- A pickaxe (so you can’t mine stone or ore)
- A sword (so you can’t fight back)
- A chest (so you can’t store anything safely)
- A furnace (so you can’t cook food or smelt metal)
- A bow (so ranged combat is impossible)
- A shield, a door, a bed — nothing
There are over 200 recipes in Minecraft that require the full 3×3 crafting grid. The 2×2 default covers maybe a dozen. That’s how critical this one block is. The crafting table isn’t a tool you unlock later — it’s the first thing you need to make, every single time you start a new world.
What You Need Before You Start — Materials Checklist
Good news: this is the easiest recipe in the game to gather materials for.
Step 1 — Find a Tree and Punch It
Walk up to any tree. Any tree at all. Oak, birch, spruce, jungle, acacia, dark oak, mangrove — they all work. Stand close to the trunk and hold your left mouse button while looking at the wood block. After a few seconds, the block will break and drop a wood log.
You only need one log to make a crafting table. That’s it. One punch session at the base of a tree and you have everything you need.
Materials You Need
| Material | Quantity Needed | Where to Find It |
|---|---|---|
| Any Wood Log | 1 | Trees in any biome |
| Wood Planks (crafted) | 4 | Made from the log in your inventory |
Simple. Minimal. Accessible in literally every Minecraft world from the first 60 seconds of spawning.
Minecraft PC How to Make a Crafting Table — Step-by-Step
This is the core of what you came here for. Follow each step carefully and you’ll have your crafting table placed and ready to use in under two minutes.
Step 1 — Open Your Inventory
Press the E key on your keyboard. Your inventory screen opens. In the top-right area of this screen, you’ll see a small 2×2 grid — that’s your default crafting area. To the left of it is a box showing your character. Below are your inventory slots.
Don’t be overwhelmed by all of it. You’re only focused on that 2×2 grid right now.
Step 2 — Turn Your Log Into Wood Planks
Take the wood log from your inventory and place it into any single slot of the 2×2 crafting grid. Look at the result slot to the right — you’ll see 4 wood planks appear.
Click the planks to collect them. Do this until you’ve converted your log into planks.
Log to Planks Recipe
| Input | Grid Position | Output |
|---|---|---|
| 1 Wood Log | Any single slot in the 2×2 grid | 4 Wood Planks |
One log gives you exactly 4 planks. That’s all you need. No tools required, no special placement — just drop the log in any slot and take the result.
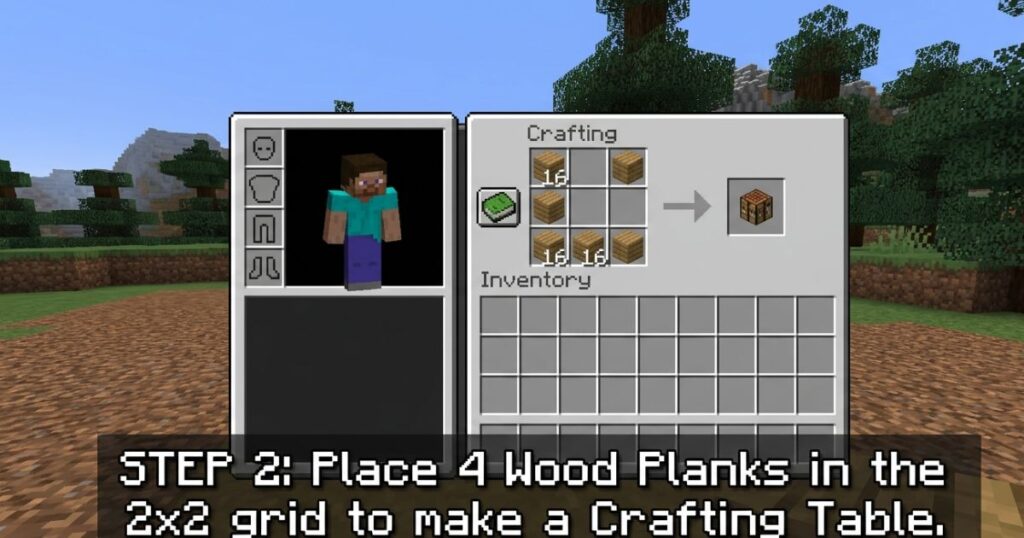
Step 3 — Craft the Crafting Table
Now, take your 4 wood planks and fill all four slots of the 2×2 crafting grid — one plank in each slot. The moment all four are placed, the crafting table will appear in the result slot to the right.
Crafting Table Recipe (2×2 Grid Layout)
| Left Column | Right Column | |
|---|---|---|
| Top Row | Wood Plank | Wood Plank |
| Bottom Row | Wood Plank | Wood Plank |
Click the crafting table from the result slot to move it into your inventory. You’ll see it appear as a block with a grid pattern on its face — that’s your crafting table.
Step 4 — Place the Crafting Table in Your World
Close your inventory (press E again). Look at your hotbar at the bottom of the screen and find your crafting table. Click the corresponding number key (or scroll your mouse wheel) to select it.
Now look at a flat surface on the ground — right in front of you works fine. Right-click to place the crafting table down. It lands as a solid block, sitting in your world, ready to use.
Right-click on the placed crafting table to open it. You’ll now see the full 3×3 grid. That’s the moment everything changes.
How to Use Your Crafting Table — First Things to Craft
You have a crafting table. You have a 3×3 grid open in front of you. Now what?
The Survival Priority Order
Your first session should follow this crafting order to stay alive:
- Sticks — foundation for all tools
- Wooden Pickaxe — mine stone and coal
- Wooden Sword — defend yourself at night
- Wooden Axe — chop wood faster
- Chest — store items so you don’t lose them
- Furnace — cook food and smelt ores
Don’t skip sticks. Almost every tool requires them and beginners often forget to make them first.
Essential Early-Game Recipes
| Item | Materials Needed | Why You Need It |
|---|---|---|
| Sticks | 2 Wood Planks (vertical) | Required for all tools and weapons |
| Wooden Pickaxe | 3 Planks (top row) + 2 Sticks (middle column) | Mine stone, coal, and more |
| Wooden Sword | 2 Planks (vertical, top) + 1 Stick (bottom) | Fight hostile mobs |
| Wooden Axe | 3 Planks (L-shape top-right) + 2 Sticks | Chop wood 3x faster |
| Chest | 8 Planks (fill all slots except center) | Store your items safely |
| Furnace | 8 Cobblestone (fill all slots except center) | Cook food, smelt ore |
How to Read Any Crafting Recipe
Every recipe in Minecraft follows a pattern placed within the 3×3 grid. The arrangement matters — a pickaxe and a sword use the same materials but in different patterns, and they produce completely different results.
Here’s how to get comfortable with it quickly:
- Look at the shape the recipe makes, not just the ingredients
- Use the Recipe Book — click the green book icon in the bottom-left of your crafting table UI. It shows every unlocked recipe with a visual layout you can click to auto-fill
- When in doubt, open the Recipe Book and search by item name
The Recipe Book is your best friend as a beginner. Use it without shame.
Pro Tips for Beginners — Make the Most of Your Crafting Table
Knowing how to make a crafting table in Minecraft PC is one thing. Using it smartly is what separates a player who survives night one from one who dies repeatedly and quits.
Tip 1 — Always Have a Crafting Table in Your Inventory
The crafting table takes up just one inventory slot. Carry it everywhere, especially in early game. If you’re exploring caves or heading away from your base and you run out of torches or break your tools, you can place the table anywhere — on the ground, on a cave wall — craft what you need, then pick it back up.
To pick it back up: just left-click and hold on the placed crafting table (no tools needed) until it breaks. It drops as an item and goes straight back into your inventory.
Tip 2 — Set Up a Proper Base Station
The moment you decide where your shelter is going, place your crafting table there alongside a chest and a furnace. These three blocks together form the core of every Minecraft base, from beginner shacks to mega builds:
- Crafting Table — make everything
- Chest — store everything
- Furnace — smelt and cook everything
Put them close together. You’ll thank yourself on day 3 when you’re managing multiple resource types.
Tip 3 — Unlock the Recipe Book Early
Inside your crafting table, there’s a small green book icon in the lower-left corner. Click it. Every recipe you’ve unlocked appears here in a searchable, clickable format. When you click a recipe, it highlights exactly where to place each item in the grid.
For beginners, this removes the frustration of memorizing dozens of patterns before you’re ready. Let the game teach you at your own pace.
Tip 4 — Wood Type Does Not Matter for Recipes
You might see online that there are dozens of different wood types in Minecraft — oak, birch, spruce, jungle, acacia, dark oak, cherry, mangrove. They all look different. Builds use them for aesthetic variety.
But for crafting? They are all identical. One oak plank and one birch plank perform exactly the same function in any recipe. You can mix types freely. Don’t go searching for a specific wood type when you just need planks to craft something.
Tip 5 — Upgrade Your Tools as Fast as Possible
Your wooden tools are a starting point, not a destination. The upgrade path goes:
Wood → Stone → Iron → Diamond → Netherite
Each tier is dramatically more effective than the last. As soon as your wooden pickaxe gets you cobblestone, use that cobblestone to make stone tools at your crafting table. Stone tools are twice as fast and last significantly longer. Get off wood as quickly as possible.
Common Mistakes Beginners Make (And How to Fix Them)
Everyone makes these mistakes. Knowing them in advance saves you real frustration.
| Mistake | Why It Happens | The Fix |
|---|---|---|
| Crafting the table but not placing it | You forget to take it off your hotbar and use it | Always place it immediately after crafting |
| Opening inventory instead of the table | Pressing E while looking at the table | Right-click directly on the placed block |
| Losing the crafting table when moving base | Walking away without picking it up | Break it first — it always drops as an item |
| Trying to match wood types | Thinking recipes require specific wood | Any plank type works in any recipe |
| Running out of tools with no table nearby | Not carrying the table while exploring | Keep it in your inventory at all times |
| Not using the Recipe Book | Not knowing it exists | Click the green book icon inside the table UI |
Minecraft PC Controls — Quick Reference Card
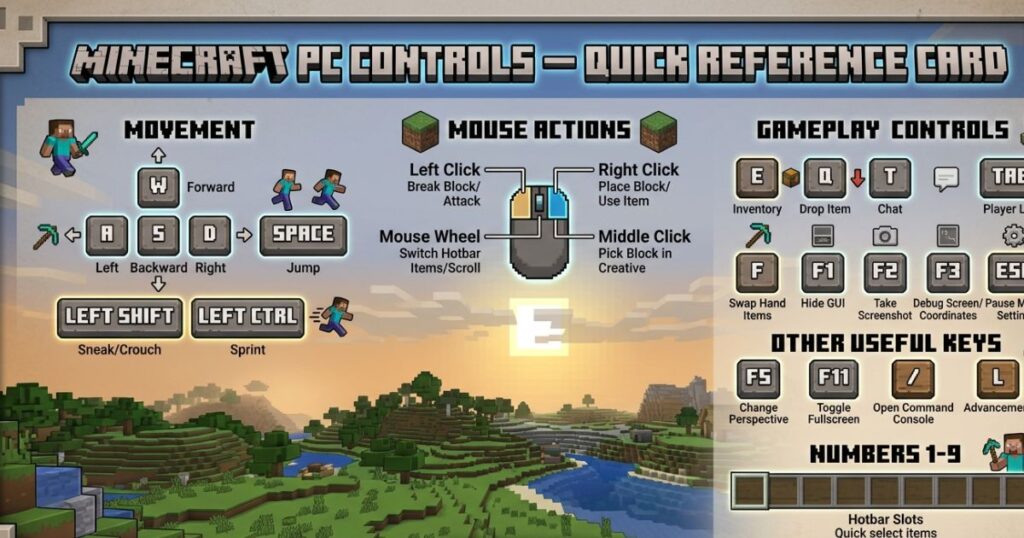
If you’re brand new to Minecraft on PC, these are the controls you’ll use constantly during your first sessions.
| Action | PC Key or Mouse Button |
|---|---|
| Open / Close Inventory | E |
| Break blocks / Punch tree | Hold Left Mouse Button |
| Place block / Open crafting table | Right Mouse Button |
| Select hotbar slot | Number keys 1–9 or scroll wheel |
| Move item to/from inventory | Left-click to pick up, click again to place |
| Split a stack of items | Right-click on a stack |
| Quick-move item to inventory | Shift + Left-click |
| Crouch (useful for precise placing) | Left Shift |
| Sprint | Double-tap W or hold Ctrl |
Print this out or keep it in a tab. You’ll reference it more than you expect during your first few hours.
FAQ — Minecraft PC How to Make a Crafting Table
Q1 — How do I make a crafting table in Minecraft PC without any tools?
You don’t need tools at all. Walk up to any tree, hold left-click to break the trunk with your bare hand, collect the log, open your inventory with E, place the log in your 2×2 crafting grid to get 4 planks, then fill all 4 grid slots with those planks. The crafting table appears in the result slot. The whole process takes under 60 seconds.
Q2 — Can I make a Minecraft PC crafting table with any type of wood?
Completely. Oak, birch, spruce, jungle, acacia, dark oak, cherry, or mangrove — every single one works. The game doesn’t care which type you use. Grab whatever tree is closest to you when you spawn.
Q3 — Why am I not seeing the 3×3 crafting grid?
You’re probably opening your inventory instead of the placed crafting table. Press E to close your inventory, look directly at the crafting table block on the ground, and right-click on it. The 3×3 grid only opens when you interact with the placed block — not from your inventory screen.
Q4 — How many planks do I need to craft a crafting table in Minecraft PC?
Exactly 4 wood planks. Since 1 log produces 4 planks, you only need to find and break a single piece of wood from any tree. It’s the most beginner-accessible recipe in the entire game.
Q5 — Can I move my crafting table to a new location?
Yes, and it’s easy. Just left-click and hold on the crafting table (no tool required) until it breaks. It drops as a block item, you pick it up, and you can place it anywhere else with a right-click. Nothing is lost — you get the same table back every time.
Q6 — Does the crafting table recipe change between Java Edition and Bedrock Edition on PC?
No. Whether you’re playing Java Edition or Bedrock Edition on PC, the recipe is exactly the same: 4 wood planks filling a 2×2 pattern. The controls and some menu layouts differ slightly between editions, but the crafting recipes are universal.
Q7 — What should I craft first after making my crafting table?
Make sticks first (2 planks stacked vertically in the crafting grid), then immediately craft a wooden pickaxe. The pickaxe lets you mine stone, and stone lets you upgrade to stone tools within the first few minutes. From there, craft a sword before night hits.
Conclusion
Here’s what just happened. You went from having nothing — one log, zero tools, zero understanding — to having the single most important block in Minecraft sitting in your world.
One tree. One log. Four planks. Four slots. One crafting table.
That’s the entire chain. And it unlocks everything else.
From this block, you’ll make your first pickaxe. Then your first sword. Then a chest to store your items, a furnace to smelt your first iron ore, and eventually a bed to survive your first night without a single monster touching you. Every house you’ll ever build, every mine you’ll ever dig, every weapon you’ll ever forge — it all flows from this one small wooden table sitting on the ground in front of you.
The crafting table isn’t just a block. It’s the moment you stop being lost and start actually playing Minecraft.
So here’s your next move: place that crafting table down, right-click it, open the Recipe Book, and make your first pickaxe. Stone is waiting just underground. Coal is waiting to be smelted into torches. Night is coming — and now, for the first time, you’re ready for it.
Go build something.
Enjoyed this guide? Explore the next steps in your Minecraft journey — how to build your first shelter, how to find and mine iron, and how to survive your first night without losing everything. Your adventure is just getting started.