How to Make a Armor Stand in Minecraft PC – Easy Step-by-Step Guide
Table of Contents
You spent three in-game days mining for that diamond ore. You survived a creeper ambush, fell into lava twice, and somehow made it back with enough materials to forge a full set of diamond armor. Now it’s sitting in a chest — buried under wood planks and leftover carrots — like it means nothing.
That’s not how your gear deserves to be treated.
An armor stand doesn’t just hold your equipment. It puts your hard work on display, turns your base into something that actually feels lived-in, and gives your builds a personality that a plain chest never could. Whether you’re decorating a throne room, organizing a gear wall, or just want your base to look less like a storage closet, learning how to make an armor stand in Minecraft PC is one of those small skills that makes a surprisingly big difference.
This guide walks you through everything — from gathering materials to placing your stand and using it like a seasoned builder.
What Is an Armor Stand in Minecraft?
More Than Just Decoration
Most players discover the armor stand and think it’s purely cosmetic. It’s not. Yes, it looks great displaying your enchanted netherite helmet — but it’s also a functional entity in the game world, meaning it behaves more like a mob than a block.
That distinction matters. Because it’s an entity, armor stands can be moved, pushed by pistons, affected by gravity in certain setups, and even detected by sculk sensors in your redstone builds. Advanced players use them inside command-block contraptions to create animations, traps, and interactive map elements.
For most players though, it’s simple: you want somewhere to show off your gear. And this is exactly what you need.
Materials You Need to Make an Armor Stand in Minecraft PC
Gather These Before You Craft
Nothing is worse than sitting down at your crafting table and realizing you’re one ingredient short. Here’s everything you need, where to find it, and how to prepare it:
| Material | Quantity Needed | How to Get It |
|---|---|---|
| Sticks | 6 | Craft from wooden planks (2 planks = 4 sticks) |
| Smooth Stone Slab | 1 | Smelt cobblestone twice, then craft into slabs |
| Wooden Planks | 2–4 | Chop any tree with your hand or axe |
| Furnace | 1 | Arrange 8 cobblestones in a ring on a crafting table |
| Cobblestone | 3+ | Mine stone underground with any pickaxe |
The ingredient that trips up most beginners is the smooth stone slab. It sounds simple, but there’s an extra step involved that’s easy to miss.
How to Make a Smooth Stone Slab (Don’t Skip This)
This is where many players get stuck. A regular stone slab won’t work. You need smooth stone specifically.
Here’s how to get it:
- Mine cobblestone with any pickaxe
- Place it in your furnace and smelt it — this gives you regular stone
- Take that stone and smelt it again in the furnace — this gives you smooth stone
- Open the crafting table and arrange three smooth stone blocks in a single horizontal line.
- This gives you 6 smooth stone slabs — you only need 1 for the armor stand
Yes, you smelt it twice. That second smelt is the step most players forget, and it’s the reason the recipe doesn’t work when they try it.
How to Make an Armor Stand in Minecraft PC – Step-by-Step
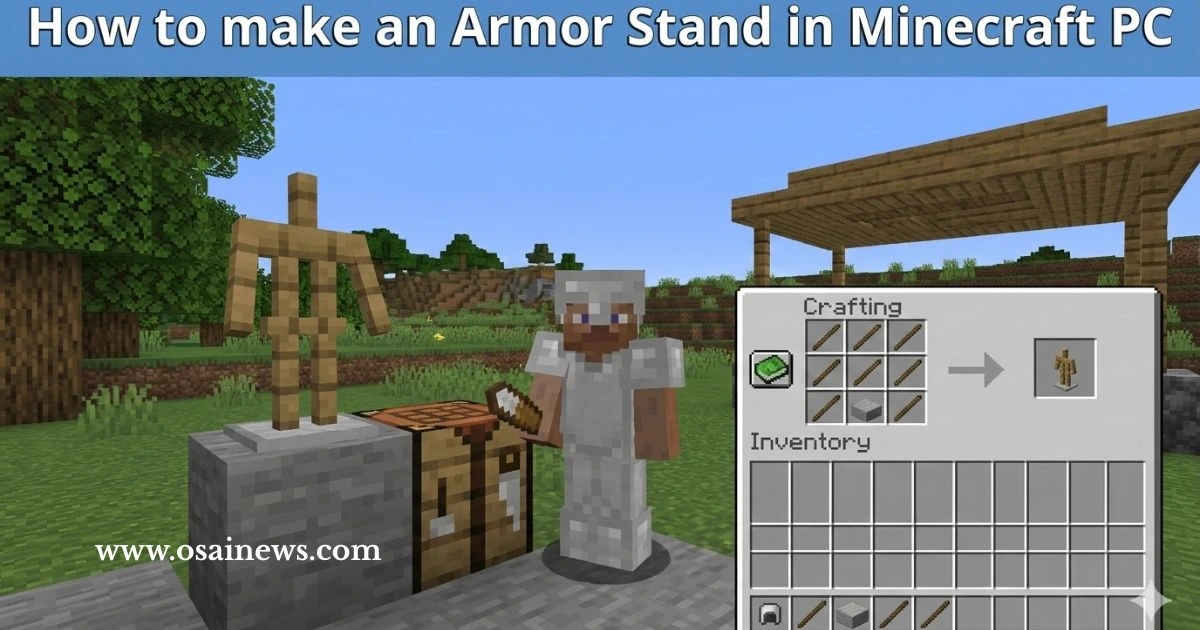
The Exact Crafting Recipe
Now that your materials are ready, open your crafting table and follow this pattern precisely:
| Left Column | Middle Column | Right Column | |
|---|---|---|---|
| Row 1 | Stick | — | Stick |
| Row 2 | Stick | — | Stick |
| Row 3 | Stick | Smooth Stone Slab | Stick |
Here’s a quick visual to make it even clearer:
[S] [ ] [S]
[S] [ ] [S]
[S] [SS] [S]
S = Stick | SS = Smooth Stone Slab
Once you place everything correctly, the armor stand will appear in the result box on the right. Drag it into your inventory and you’re done.
Step-by-Step Crafting Walkthrough
If you want to follow it one action at a time:
- Place your crafting table on the ground and right-click it to open the 3×3 grid
- Fill the left column — place one stick in each of the three left slots
- Fill the right column — place one stick in each of the three right slots
- Place the smooth stone slab in the bottom-center slot (Row 3, middle)
- Collect your armor stand from the output slot
That’s it. Six sticks, one smooth stone slab, and about two minutes of preparation.
Mistakes That Will Break Your Recipe
Before you start crafting, watch out for these common errors:
- ❌ Using a regular stone slab — it has to be smooth stone, not plain stone
- ❌ Using the 2×2 personal grid — your inventory crafting area is too small; you need a full crafting table
- ❌ Wrong stick placement — sticks go on the outer columns, not in the center
- ❌ Smelting only once — stone won’t work; you need smooth stone, which requires a second smelt
How to Place and Use Your Armor Stand
Placing It in Your World
Once it’s in your hotbar, select it and right-click on any flat solid surface to place it. Your armor stand will appear as a wooden figure standing upright, ready to be equipped.
A few placement tips worth knowing:
- You can place armor stands on slabs and stairs
- They can be placed underwater without breaking
- In Java Edition, you can even mount them in unusual orientations using commands
How to Equip Armor on Your Stand
Equipping your armor stand is as intuitive as placing it. Here’s how each piece works:
| Armor Piece | How to Equip It |
|---|---|
| Helmet | Hold the helmet and right-click the stand’s head |
| Chestplate | Right-click the chest/torso area |
| Leggings | Right-click the lower body |
| Boots | Right-click near the feet |
| Remove any piece | Right-click the equipped slot to take it back |
You can mix and match any armor type — leather, iron, gold, diamond, netherite. You can also place carved pumpkins, mob heads, and even elytra wings on your stand.
What Can an Armor Stand Actually Hold?
- ✅ All armor types (leather through netherite)
- ✅ Carved pumpkins and player/mob heads
- ✅ Elytra
- ✅ Items in hand slots (via commands in Java Edition)
- ❌ Tools and weapons without using commands
Creative Ways to Use Armor Stands in Your Builds
Ideas That Go Beyond Basic Storage
Once you know how to make an armor stand in Minecraft PC, the real fun is figuring out what to do with it. Here are some ideas that builders actually use:
- Knight’s Hall — Line up armor stands in full iron or diamond sets along a corridor for a castle guard effect
- Trophy Room — Display armor from every tier of the game as you progress
- NPC Figures — Combine heads, colored armor, and custom names with name tags to create character figures
- Item Museum — Show off rare drops like skulls, elytras, and enchanted gear on labeled stands
- Redstone Integration — Use armor stands as entity targets in sculk sensor or command-block setups
Advanced: Commands That Transform Armor Stands (Java Edition)
If you’re on Java Edition PC and comfortable with commands, these open up a whole new level of control:
| Command | What It Does |
|---|---|
/summon armor_stand ~ ~ ~ {ShowArms:1b} | Adds visible arms to the stand |
/summon armor_stand ~ ~ ~ {Small:1b} | Spawns a mini armor stand |
/summon armor_stand ~ ~ ~ {Invisible:1b} | Hides the stand — items appear to float |
/summon armor_stand ~ ~ ~ {NoGravity:1b} | Stand hovers in mid-air |
These commands are especially useful for adventure maps, cinematic builds, and decorative setups where the stand itself shouldn’t be visible.
Key Differences Between Java Edition and Bedrock Edition
| Feature | Java Edition (PC) | Bedrock Edition |
|---|---|---|
| Crafting Recipe | 6 sticks + 1 smooth stone slab | Same |
| Pose Customization | Commands / datapacks | Built-in UI |
| Visible Arms | Command required | Easy toggle |
| Small Stand Option | Command required | Built-in option |
| Inventory GUI | None | Has a dedicated GUI |
Since this guide focuses on Minecraft PC (Java Edition), commands are your main tool for advanced customization. Bedrock players get a slightly more user-friendly interface for poses.
FAQ – How to Make a Armor Stand in Minecraft PC
Q1: How do you make an armor stand in Minecraft PC? Use 6 sticks and 1 smooth stone slab in a crafting table. Place sticks in the left and right columns across all three rows, and put the smooth stone slab in the bottom-center slot.
Q2: Why isn’t my armor stand recipe working in Minecraft PC? The most likely reason is that you’re using a regular stone slab instead of a smooth stone slab. Smelt cobblestone twice to produce smooth stone, then craft the smooth stone into slabs.
Q3: Can armor stands hold weapons in Minecraft PC? Not by default in vanilla Java Edition. You can place items in hand slots using the /item command or certain datapacks.
Q4: Where can I find armor stands without crafting? Check Taiga villages — armor stands spawn naturally there, sometimes already wearing armor.
Q5: How do I make a small armor stand in Minecraft Java Edition? Use the command: /summon armor_stand ~ ~ ~ {Small:1b} to spawn a miniature version.
Q6: Can I pose my armor stand in Minecraft PC? Yes, through commands or the Armor Stand Book datapack, which gives you a simple in-game interface for custom poses.
Conclusion
Your Gear Has a Story — Give It a Place to Stand
Crafting an armor stand in Minecraft PC takes less than five minutes once you know what you’re doing. Six sticks, one smooth stone slab, and a crafting table is all it takes to turn your base from a cluttered storage room into something that actually reflects the work you’ve put in.
Start with one stand. Display your best set. Then build from there — a trophy wall, a guard room, a fully decorated hall that tells the story of your survival.
Your next step: Go smelt that cobblestone, craft your first armor stand, and find the perfect spot in your base to place it. Once you do, you’ll wonder how you ever played without one.