
How to Adjust Margins in Google Docs (Step-by-Step)
Table of Contents
You finally finish your document. Hours of work, careful wording, everything just right. Then you hit print — and the text sits awkwardly close to the edge, or your professor emails back saying your margins don’t meet the required format. That moment of frustration is something most Google Docs users know all too well.
Here’s the thing: adjusting margins in Google Docs is one of those skills that looks minor on the surface but quietly shapes how every single document you create is received. Get it right, and your work looks polished, intentional, and professional. Get it wrong, and even great writing can appear sloppy or non-compliant.
This guide walks you through everything — from the default settings to three distinct methods, mobile adjustments, use-case-specific recommendations, and the mistakes most people never realize they’re making. By the time you reach the end, you’ll handle margins in Google Docs like someone who’s been doing it for years.
Why Margins Matter More Than You Think
Most people treat margins as an afterthought. They open a document, start typing, and never touch the margin settings at all. But margins do a lot of quiet, important work behind the scenes.
First, they control readability. Wide margins give your text room to breathe. Tight margins make a page feel dense and overwhelming. The right margin balance guides the reader’s eye naturally from line to line without fatigue.
Second, they affect print output. What looks fine on screen can bleed off the page or look off-center when printed, especially on different printers or paper sizes. Margins act as your safety buffer.
Third, they communicate compliance and professionalism. Academic institutions, law firms, publishing houses, and employers often have strict margin requirements. Submitting a document that doesn’t meet those specifications signals carelessness — even when your content is excellent.
Here’s a quick look at what different professional settings typically require:
| Document Type | Recommended Margins |
|---|---|
| Academic Paper (APA/MLA) | 1 inch all sides |
| Business Letter | 1–1.5 inch sides |
| Resume | 0.5–1 inch all sides |
| Book Manuscript | 1 inch top/bottom, 1.25 inch sides |
| Legal Document | 1–1.5 inch all sides |
Understanding these standards before you start typing saves you from reformatting entire documents later.
What Are the Default Margins in Google Docs?
Before changing anything, it helps to know what you’re starting with.
When you open a blank document in Google Docs, the margins are automatically set to 1 inch on all four sides — top, bottom, left, and right. This default aligns with the most widely accepted standard across academic and professional writing, which is why Google chose it as the baseline.
For most everyday writing tasks, that 1-inch default works perfectly. You don’t need to touch a thing. But the moment your document has specific requirements — a resume that needs to fit on one page, a manuscript with publisher-specified margins, or a legal brief with court-mandated formatting — you’ll need to step in and adjust.
Knowing the default also helps when you accidentally shift a margin and need to reset it. Instead of guessing, you know exactly what to type back in: 1.00 on all sides.
How to Adjust Margins in Google Docs — 3 Methods That Actually Work
There isn’t just one way to change your margins. Google Docs gives you three distinct paths, and the best one depends on what device you’re using and how precise you need to be.
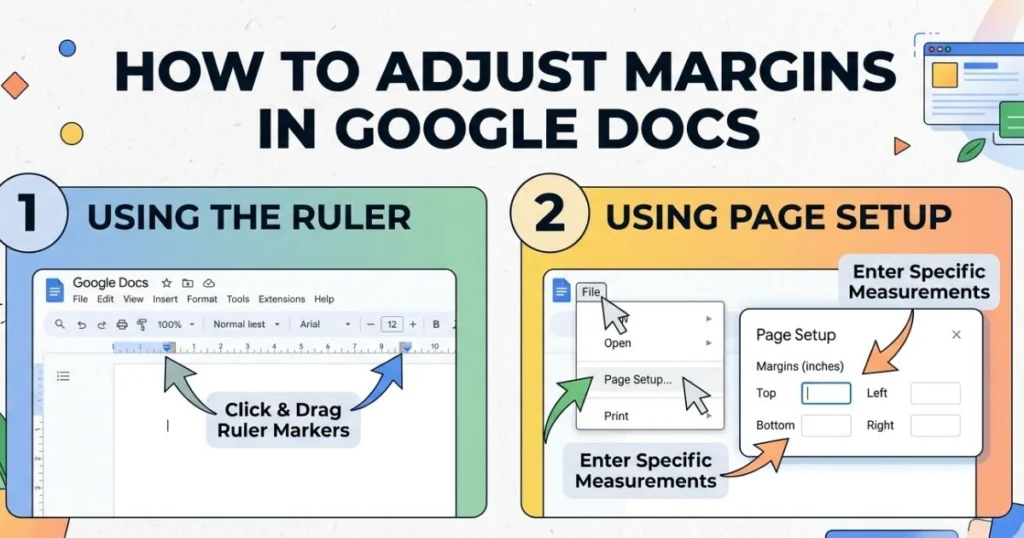
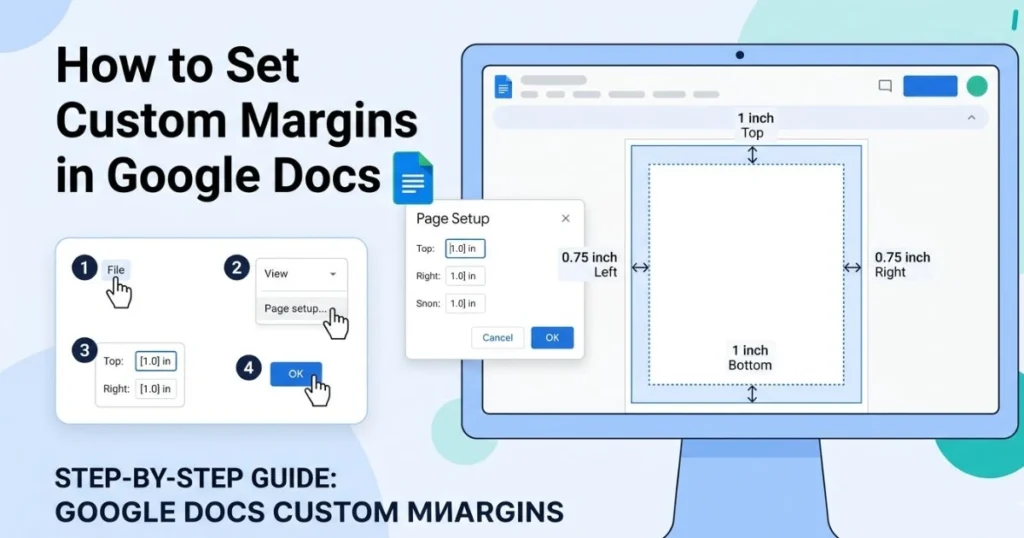
Method 1 — Using the Page Setup Menu (Most Reliable)
This is the method you’ll use most frequently. It’s precise, straightforward, and works on any desktop or laptop browser.
Here’s exactly what you do:
- Open your document in Google Docs
- Click File in the top-left menu bar
- Scroll down and select Page Setup
- A dialog box opens showing four margin fields: Top, Bottom, Left, Right
- Click into each field and type your desired margin size in inches
- When you’re done, click OK to apply the changes immediately
That’s it. Your document adjusts in real time the moment you click OK.
One thing worth knowing: that same dialog box has a button labeled Set as Default. If you click that before hitting OK, every new Google Doc you create from that point forward will open with those same margin settings. If you frequently work with the same margin requirements — say, you’re always writing APA-format papers — this one click saves you a lot of repetitive setup work.
Tips to keep in mind with this method:
- Double-check whether the measurements are in inches or centimeters — you can verify this in File > Page Setup where the unit is labeled next to each field
- You can set different values for each of the four sides independently, which is useful for documents like books or reports where the left and right margins differ
- This method is the most accurate because you type exact numbers rather than eyeballing a ruler
Method 2 — Using the Ruler (Quick Visual Adjustment)
The ruler method is faster but slightly less precise. It’s ideal when you want to make a quick visual tweak without opening any menus.
Follow these steps:
- Open your document in Google Docs
- If you don’t see a ruler at the top of the page, go to View in the menu bar and click Show Ruler
- Look at the horizontal ruler — you’ll notice gray sections on either end and a white section in the middle. The boundary between gray and white represents your margin
- Hover your cursor over that gray-white boundary until it changes into a double-headed arrow
- Click and drag left or right to move the margin
- Release when you’re satisfied with the position
- Repeat on the other side for the right margin
- Use the vertical ruler on the left side of the page to adjust top and bottom margins the same way
One critical warning: the ruler also contains indent markers — small triangles sitting on the white section of the ruler. A lot of people accidentally grab those instead of the margin boundary, which shifts the paragraph indent rather than the actual margin. If your text moves but the gray area doesn’t, you’ve grabbed the wrong thing. Undo with Ctrl + Z (Windows) or Cmd + Z (Mac) and try again, this time making sure your cursor has fully changed to the double arrow before clicking.
When this method works best:
- Informal documents where exact measurements aren’t critical
- Quick layout adjustments when you want to see the visual effect immediately
- Situations where you want to compare different margin widths visually before committing
Method 3 — Using Google Docs on Mobile (Android & iOS)
If you’re editing on your phone or tablet, the ruler and desktop menus aren’t available — but you can still adjust margins through the app.
Here’s how:
- Open the Google Docs app on your Android or iOS device
- Tap the three-dot menu (⋮) in the top-right corner of the screen
- Select Page Setup from the menu that appears
- Tap Margins
- You’ll see preset options — Narrow, Default, and Wide — along with the option to enter a custom value
- Select the preset that fits your needs, or tap the custom field and type in your measurement
- Tap the checkmark or Done to save
The mobile method is slightly more limited than desktop — you can’t drag a ruler or see the changes in real time as easily. But for quick adjustments on the go, it works well, and your changes sync instantly across all devices logged into your Google account.
How to Set Custom Margins in Google Docs
Sometimes the preset options don’t cut it. Maybe your publisher wants 1.25-inch side margins, or your school has a specific top margin requirement that doesn’t match any standard setting. That’s where custom margins come in.
The process uses Method 1 (Page Setup) as its foundation:
- Go to File > Page Setup
- Clear the existing value in each margin field
- Type your exact custom measurement
- Click OK — or Set as Default if you want this to become your new baseline
Custom margins apply to the entire document by default. If you need different margins in different parts of the same document, you’ll need to use section breaks — which leads to the next section.
How to Set Different Margins for Different Pages in Google Docs
Google Docs doesn’t support per-page margin settings the same way Microsoft Word does, but there’s a reliable workaround using Section Breaks.
Here’s how to do it:
- Place your cursor at the exact point in your document where you want the new margin to begin
- Go to Insert > Break > Section Break (Next Page)
- Click anywhere inside the new section you just created
- Go to File > Page Setup
- Enter your desired margins for that section
- Click OK
Only the section where your cursor was placed will take on the new margin settings. The rest of your document keeps its original formatting.
This is especially useful for documents that combine different content types — like a report with a full-width table in the middle, or a book where the first page (a title page) has different margins than the body chapters.
A Side-by-Side Comparison of All Margin Methods
| Method | Device | Precision | Speed | Best For |
|---|---|---|---|---|
| File > Page Setup | Desktop | High | Medium | All professional documents |
| Ruler Drag | Desktop | Medium | Fast | Quick visual tweaks |
| Mobile App | Phone/Tablet | Medium | Fast | On-the-go editing |
| Section Break + Setup | Desktop | High | Slow | Mixed-margin documents |
Common Margin Mistakes and How to Avoid Them
Even experienced Google Docs users trip up on margins. Here are the most frequent errors — and exactly how to sidestep each one.
Mistake 1: Dragging the indent marker instead of the margin As mentioned earlier, the ruler contains both indent markers and margin boundaries. Always wait for the double-headed arrow cursor before dragging. If the gray section doesn’t move, you’ve grabbed the wrong element.
Mistake 2: Forgetting to click “Set as Default” You spend time configuring the perfect margin setup, apply it to your current document, and then open a new document the next day — only to find it’s back to the defaults. If you use the same margins regularly, always click Set as Default before closing the Page Setup dialog.
Mistake 3: Margins too narrow for printing Going below 0.5 inches on any side is risky. Most home and office printers have a minimum non-printable zone near the paper edge. If your margin is narrower than that zone, content gets clipped. Stick to at least 0.5 inches minimum on all sides for anything that will be printed.
Mistake 4: Not checking margins before submitting Always verify your final margin settings before sending or submitting. Go to File > Page Setup for a quick check, or use File > Print to preview the actual print layout.
Mistake 5: Applying mobile changes without verifying on desktop Mobile syncing is generally smooth, but always do a final review on desktop — especially for documents that will be printed or formally submitted.
Pro tips to work smarter:
- Use Ctrl + Shift + P (Windows) or Cmd + Shift + P (Mac) to quickly open print preview and visually check your margins
- Create a personal Google Docs template with your most-used margin settings already in place — open that template every time instead of reconfiguring from scratch
- If you frequently switch between margin styles (academic vs. professional), keep a simple reference note with your standard settings for each
How to Adjust Margins in Google Docs for Specific Use Cases
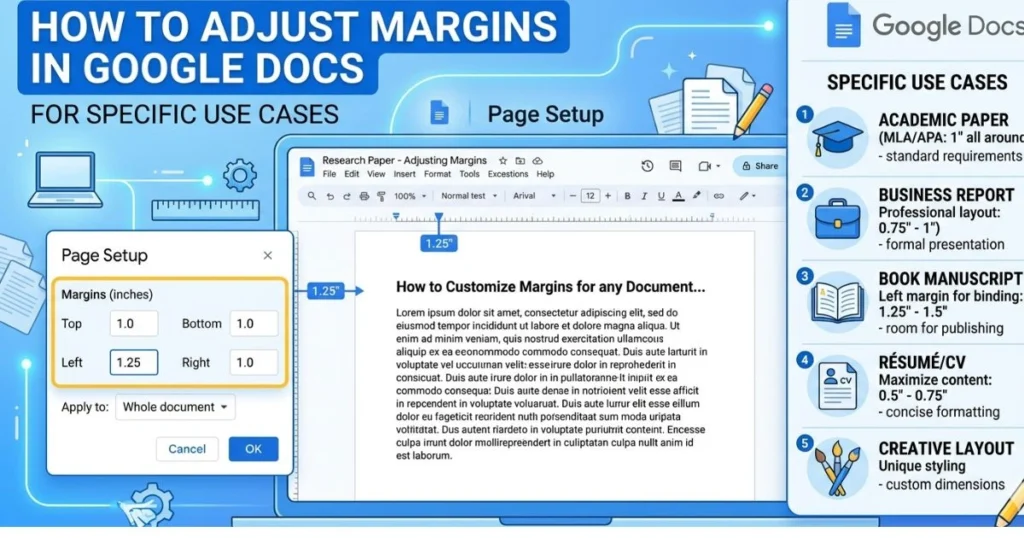
Different documents demand different margin standards. Here’s what you should know for the most common situations.
Margins for APA Format in Google Docs
APA 7th edition requires 1-inch margins on all four sides — which happens to match Google Docs‘ default. To verify or set this:
- Go to File > Page Setup
- Confirm all four fields show 1.00
- Click OK if any adjustments are needed
Beyond margins, APA also requires double spacing, Times New Roman or a similar serif font at 12pt, and a running head on each page. Setting your margins correctly is the first step — but don’t stop there.
Margins for MLA Format in Google Docs
MLA format also requires 1-inch margins all around, again matching the default. The steps are identical to APA above.
Where students often go wrong with MLA is the header and page number setup, not the margins themselves. Once your margins are confirmed at 1 inch, turn your attention to the header formatting, which MLA places in the top-right corner of every page.
Margins for a Resume in Google Docs
A resume is where margin customization becomes genuinely practical. If you have a lot of experience to fit onto a single page, you can bring margins down to 0.5 inches on all sides without it looking unprofessional — as long as the rest of your formatting stays clean.
For most people, the sweet spot is somewhere between 0.75 and 1 inch. Wide enough to look professional, tight enough to give your content room.
Never go below 0.5 inches on a resume. Recruiters read dozens of resumes in one sitting, and a page that looks cramped or hard to scan creates a negative impression before they’ve read a single word.
Margins for Printing a Booklet or Book in Google Docs
Book formatting typically requires mirror margins — where the inside margin (the gutter, near the spine) is larger than the outside margin. Google Docs doesn’t have a built-in mirror margin feature.
Your options:
- Export to Microsoft Word and use its built-in mirror margin tool
- Use a Google Docs add-on such as Typeset or similar formatting tools designed for book layouts
- Manually adjust left and right margins per section using the section break method, alternating wider left and right margins on odd and even pages
For professional book publishing, exporting to a dedicated desktop publishing tool is usually the cleaner path.
Frequently Asked Questions — How to Adjust Margins in Google Docs
How do I adjust margins in Google Docs quickly?
The fastest desktop method is File > Page Setup — type your values and click OK in under 30 seconds. On mobile, use the three-dot menu, then Page Setup, then Margins.
Can I set different margins for each page in Google Docs?
Not directly on a per-page basis. But you can use Section Breaks (Insert > Break > Section Break) to apply distinct margin settings to different sections of your document.
What are the default margin settings in Google Docs?
Google Docs defaults to 1 inch (2.54 cm) on all four sides — top, bottom, left, and right.
How do I change margins in Google Docs on my phone?
Open the Docs app, tap the three-dot menu, select Page Setup, tap Margins, and choose a preset or enter a custom value.
Why can’t I drag the margin on the ruler in Google Docs?
You’re likely dragging the indent marker instead of the margin boundary. Make sure the ruler is visible (View > Show Ruler) and that your cursor changes to a double-headed arrow before you click and drag.
How do I set 1-inch margins in Google Docs?
Go to File > Page Setup, enter 1 in all four margin fields, and click OK. That’s the standard for APA, MLA, and most professional documents.
Does changing margins in Google Docs affect the whole document?
Yes — by default, margin changes apply document-wide. To apply different margins to specific sections only, use the Section Break method described earlier in this guide.
Conclusion
Margins are never just a technical checkbox. They’re part of how your document communicates before anyone reads a single sentence. A well-formatted page signals care, precision, and respect for the reader’s time — and now you have every tool you need to get them exactly right.
You’ve learned three reliable methods for adjusting margins in Google Docs — through Page Setup, the Ruler, and the Mobile app. You know how to handle custom margins, how to apply different margins to different sections, and what specific formatting standards like APA, MLA, and resume writing actually require. You’ve also got a clear picture of the common mistakes that catch people off guard, and exactly how to avoid them.
The next time you open a Google Doc, you’re not guessing or clicking around randomly. You know what to do, where to find it, and why it matters.
Ready to take your Google Docs skills even further? Bookmark this guide so it’s always one click away the next time you need it. And if you found it useful, share it with a classmate, colleague, or anyone else who’s ever printed a document and winced at the result. A little formatting knowledge goes a long way — pass it on.