
How do you Make a Crafting Table on Minecraft PC (Easy)
Table of Contents
You remember that exact moment. You spawned into a fresh world, trees everywhere, the sky bright blue, and absolutely no idea what to do next. The sun started dropping. Something growled in the distance. And you stood there, punching a tree with your bare fist like it owed you money.
Every Minecraft player has been there. That first-night panic is basically a rite of passage. But here is the truth nobody tells you loud enough — the single item that separates a player who survives from one who gets eaten by zombies before sunrise is the crafting table.
It is not a sword. It is not a house. It is a simple wooden block that unlocks over 300 recipes and hands you the keys to everything this game has to offer. Once you know how to make it, the whole world opens up.
This guide is going to walk you through exactly how to make a crafting table in Minecraft PC, step by step, in plain language. No confusing jargon. No assumed knowledge. Just the clearest possible path from punching your first tree to placing your first crafting table — and everything you need to know after that.
What Is a Crafting Table in Minecraft and Why Does It Change Everything?
Before getting into the process, it’s useful to understand the reason behind it. When you first open Minecraft, your inventory screen shows a tiny 2×2 crafting grid in the top right corner. That grid can make a small handful of basic items — wooden planks, sticks, and not much else.
The crafting table gives you a 3×3 grid instead. That jump from four slots to nine might sound small, but it completely transforms what you can build. Wooden pickaxes, swords, shovels, chests, furnaces, bows, armor — none of that is possible without a crafting table. You are essentially locked out of the full game until you make one.
Here is a side-by-side look at what each grid gives you:
| Feature | Inventory Grid (2×2) | Crafting Table (3×3) |
|---|---|---|
| Grid Size | 2 columns × 2 rows | 3 columns × 3 rows |
| Total Slots | 4 | 9 |
| Recipes Accessible | Roughly 5 | 300+ |
| Can Craft Tools? | No | Yes |
| Can Craft Weapons? | No | Yes |
| Can Craft Armor? | No | Yes |
| Required for Survival? | Barely | Absolutely |
The crafting table is not just useful — it is mandatory. And the good news is that making one takes less than two minutes, even on your very first attempt.
What Do You Need to Make a Crafting Table in Minecraft PC?
The Required Materials
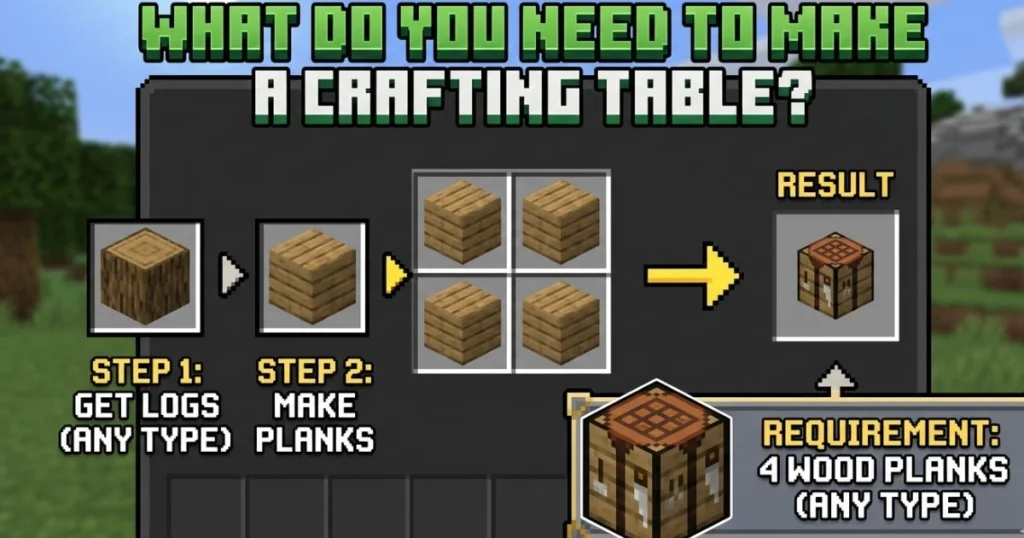
This is the part that surprises most new players: you only need one raw material to make a crafting table. That material is a Wood Log, and you need just one of them.
Here is the full ingredient breakdown:
| Item Needed | Quantity Required | How to Get It |
|---|---|---|
| Wood Log (any type) | 1 | Punch or break any tree |
| Wood Planks (crafted) | 4 | Craft from the 1 Wood Log |
One log gives you four planks. Four planks make one crafting table. That is the entire chain, and it starts the second you find a tree.
What Type of Wood Can You Use?
Any wood type works. Minecraft PC has several tree varieties, and every single one produces functional wooden planks for this recipe. Here is a quick list of all usable wood types:
- Oak (most common, found in most biomes)
- Birch (white bark, common in birch forests)
- Spruce (dark wood, found in taiga biomes)
- Jungle (large trees in jungle biomes)
- Acacia (found in savanna biomes)
- Dark Oak (found in dark forest biomes)
- Mangrove (found in mangrove swamps)
- Cherry (pink trees in cherry grove biomes)
Do not worry about mixing types for this particular recipe. Pick whatever tree is closest to you when you spawn.
Do You Need Any Tools?
No. Your bare hands are enough to collect the wood log you need. It takes a few seconds longer than using an axe, but since you do not have an axe yet, your fists will do just fine.
How do you Make a Crafting Table on Minecraft PC — Complete Step-by-Step
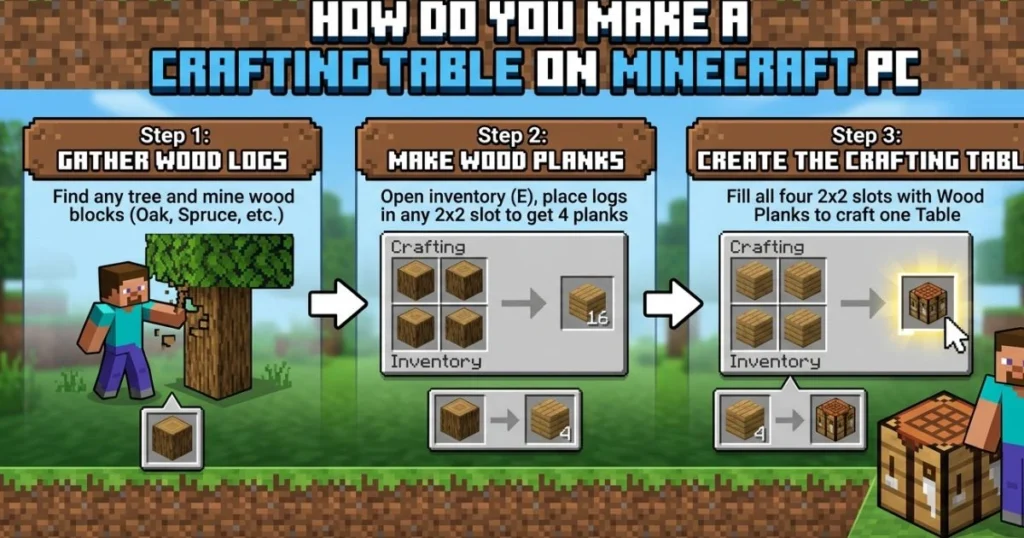
Step 1 — Find a Tree and Collect a Wood Log
Look around your spawn area. Trees are almost always within sight in most Minecraft biomes. Walk up to the trunk of any tree, hold down your left mouse button, and keep it held until the log breaks and drops as an item. Walk over it to pick it up automatically.
Quick tips for this step:
- You only need one log to start, but collecting three or four extra logs now saves you time later
- The log will appear in your inventory automatically when you walk near it
- If you spawned in a desert or snowy biome with no trees nearby, walk in any direction until you find a forest
Step 2 — Open Your Inventory
Press the E key on your keyboard. Your inventory screen will open. In the top right section of this screen, you will see a small 2×2 crafting area with four empty slots arranged in a square. This is your personal crafting grid — the one you are about to upgrade.
Step 3 — Turn Your Log Into Wood Planks
Click on the Wood Log in your inventory to pick it up, then place it into any one slot of your 2×2 crafting grid. The moment you do this, four Wood Planks will appear in the output slot to the right of the grid.
Click the output slot to collect all four planks. They will move into your inventory automatically.
Wood Plank Recipe:
| Crafting Grid | Column 1 | Column 2 |
|---|---|---|
| Row 1 | Wood Log | — |
| Row 2 | — | — |
| Output | 4 Wood Planks | — |
One log in any slot = four planks out. Simple as that.
Step 4 — Craft Your Crafting Table
Now here is the step you have been building toward. With your four Wood Planks in your inventory, place one plank in each of the four slots of your 2×2 crafting grid. Fill every slot — top left, top right, bottom left, bottom right.
When all four slots are filled, a Crafting Table will appear in the output slot. Click it to collect it.
Crafting Table Recipe:
| Crafting Grid | Column 1 | Column 2 |
|---|---|---|
| Row 1 | Wood Plank | Wood Plank |
| Row 2 | Wood Plank | Wood Plank |
| Output | Crafting Table ×1 | — |
You now have a crafting table sitting in your inventory. That block right there is the foundation of your entire Minecraft experience.
Step 5 — Place the Crafting Table in Your World
Close your inventory by pressing E again. Find the Crafting Table in your hotbar — the row of slots along the bottom of your screen. If it is not already there, open your inventory and drag it into one of the hotbar slots (numbered 1 through 9).
Press the corresponding number key to select it, or scroll your mouse wheel to highlight it. Then right-click on any flat ground surface to place it.
You will see the crafting table appear in your world as a wooden block with a crafting pattern on top. Walk up to it and right-click it to open the full 3×3 crafting grid.
Welcome to real Minecraft.
How to Use Your Crafting Table in Minecraft PC
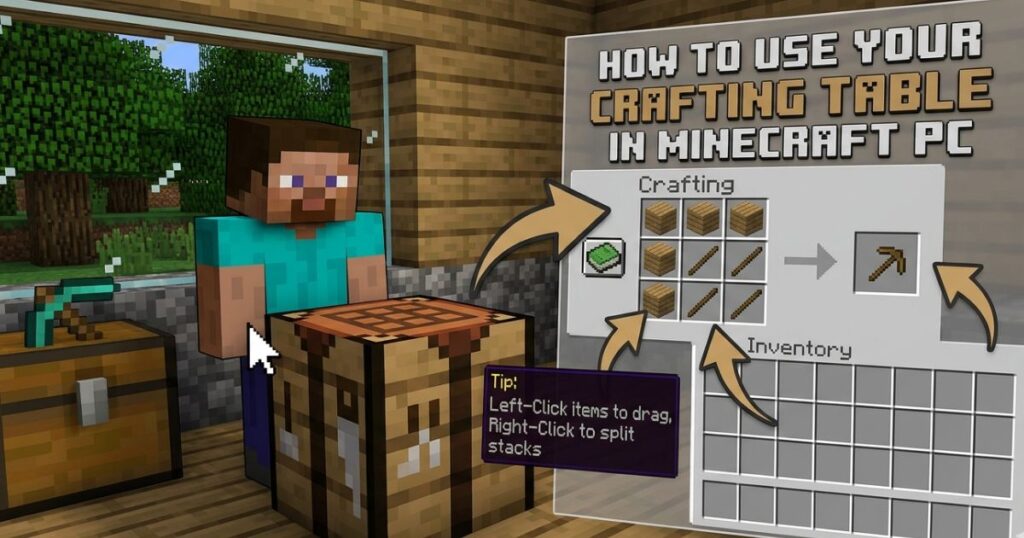
Opening and Navigating the 3×3 Grid
When you right-click your crafting table, a larger crafting interface opens. You will see:
- A 3×3 grid on the left side (9 slots for ingredients)
- An output slot on the right side (where your crafted item appears)
- A Recipe Book icon (the green book) on the far left — click this to browse available recipes
This grid works the same way as your inventory grid, but bigger. You place ingredients in specific patterns, and the correct item appears in the output slot. The position of items in the grid matters for most recipes, so placement is key.
The Most Important Recipes to Craft Right After Your Table
Your crafting table is placed. The clock is ticking on your first night. Here is exactly what you should craft first, in order of priority:
First Night Survival Recipe Priority:
| Item to Craft | Ingredients | Purpose |
|---|---|---|
| Sticks | 2 Wood Planks (stacked vertically) | Handle for all tools and torches |
| Wooden Pickaxe | 3 Planks (top row) + 2 Sticks (middle column) | Mine stone and coal |
| Wooden Sword | 2 Planks (top two of middle column) + 1 Stick (below) | Defend against mobs |
| Wooden Axe | 2 Planks + 1 Plank in L-shape + 2 Sticks | Chop wood faster |
| Chest | 8 Wood Planks around the outside of the grid | Store extra items safely |
| Torches | 1 Coal + 1 Stick (vertical) | Light up your shelter at night |
If you can craft a pickaxe and a sword before darkness falls, your chances of surviving the first night go up dramatically. The wooden pickaxe lets you mine stone, which lets you upgrade to stone tools within the first five minutes.
Pro Tips for Using the Crafting Table Like a Veteran Player
Tips Every Beginner Should Know
Once you have your crafting table placed and working, these habits will save you a lot of frustration:
- Always craft two crafting tables. Keep one at your base and carry one in your inventory. If you die far from home, you can place your spare table anywhere and keep crafting
- Use Shift + Click on the output slot to craft the maximum possible quantity at once. If you have enough materials for six wooden pickaxes, Shift-clicking produces all six in one go
- Open the Recipe Book (the green book icon inside the crafting grid screen) to see all unlocked recipes. As you collect new materials, new recipes will appear here automatically
- Craft a chest early. Once your inventory starts filling up, a chest gives you 27 extra storage slots and keeps your items safe even if you walk away
Common Beginner Mistakes (And How to Avoid Them)
Even experienced players made these mistakes when they started. Knowing them in advance puts you ahead:
- Wrong placement pattern. Tool recipes require specific shapes. A pickaxe needs three planks across the top row and two sticks going down from the center — not just planks and sticks thrown anywhere. If nothing appears in the output, check your pattern
- Leaving the crafting table behind. When you move your base or explore a new area, remember to break your crafting table and take it with you. Hold left-click on it to break it, and it will drop as a pickable item
- Not bringing a backup table. If you die far from your base, your crafting table stays where you placed it. Carrying a spare in your inventory means you are never stuck
- Forgetting sticks. Almost every tool in the game requires sticks as handles. Run out of sticks and your crafting stops cold. Keep a stack of sticks in your inventory at all times
- Skipping the stone upgrade. Once you have a wooden pickaxe, mine cobblestone immediately and upgrade to stone tools. Stone tools are twice as durable and faster than wood
Essential Keyboard Shortcuts for PC Players
Knowing these shortcuts makes your crafting sessions faster and smoother:
| Keyboard Shortcut | What It Does |
|---|---|
| E | Open and close your inventory |
| Right-Click on Crafting Table | Open the 3×3 crafting grid |
| Shift + Left-Click (output slot) | Craft maximum quantity at once |
| Left-Click + Drag across slots | Split items evenly across slots |
| Right-Click on a stack | Pick up exactly half the stack |
| Q | Drop the selected item on the ground |
| 1–9 | Select corresponding hotbar slot |
| F | Swap item between hand and offhand slot |
Advanced Crafting Table Knowledge for Growing Players
How to Pick Up and Move Your Crafting Table
Your crafting table is not permanent. You can pick it up and place it somewhere else whenever you want. To collect it:
- Walk up to the placed crafting table
- Hold left-click with your bare hand or any axe
- The table will break and drop as an item
- Walk over it to pick it up
Using an axe speeds this process up considerably, but your bare hand works fine if needed.
Can You Have Multiple Crafting Tables?
Absolutely — and you should. There is no limit to how many crafting tables you can place or carry. Many experienced players keep:
- One in their main base near their storage chest setup
- One in each secondary base or outpost
- One in their inventory for crafting on the go
Since each crafting table costs only four wood planks to make, producing extras is practically free once you have a wood supply going.
Crafting Table vs. Other Crafting Stations
As you progress in Minecraft, you will discover that the crafting table is just the first of several crafting stations. Here is a quick overview of where the crafting table fits in the bigger picture:
| Crafting Station | What It Does | When You Need It |
|---|---|---|
| Crafting Table | 3×3 recipe crafting | From day one, always |
| Furnace | Smelt ores and cook food | After your first mining trip |
| Smithing Table | Upgrade gear to Netherite | Late game |
| Anvil | Rename items and repair gear | Mid to late game |
| Enchanting Table | Add enchantments to gear | Mid game and beyond |
| Loom | Craft banner patterns | Decorative building |
| Stonecutter | Cut stone into specific shapes | Building and decoration |
The crafting table never becomes obsolete. Even in late-game Minecraft, you use it constantly for every recipe that does not require a specialized station.
Frequently Asked Questions — How Do You Make a Crafting Table in Minecraft PC?
How do you make a crafting table in Minecraft PC without mods?
You don’t need any mods whatsoever. The crafting table is a core item built into the base game from the very beginning. All you need is one wood log from any tree, convert it to four wooden planks in your inventory grid, then fill all four slots of that grid with one plank each. The crafting table will appear as the output. No mods, no add-ons, no extra downloads required.
Can you make a crafting table in Minecraft PC on Creative Mode?
Yes, and it is even easier in Creative Mode. Open your inventory by pressing E, then use the search bar at the top to type “crafting table.” The item will appear immediately. Click it to add it to your inventory in unlimited quantity. You can also find it under the Functional Blocks tab of the Creative inventory. In Creative Mode, no materials are needed at all.
What is the exact crafting table recipe in Minecraft PC?
Place one Wood Plank in each of the four slots of your 2×2 inventory crafting grid — top left, top right, bottom left, bottom right. Fill every slot with one plank each. One Crafting Table will appear in the output slot. Collect it by clicking the output. That is the complete recipe.
How do you make a crafting table in Minecraft PC on the very first day of a new world?
The moment you spawn, locate the nearest tree and punch the trunk by holding left-click until a log drops. Open your inventory with E, place the log in your 2×2 crafting grid, collect the four planks, then fill all four grid slots with one plank each. Collect your crafting table, place it on the ground with right-click, and open it. This entire process takes under two minutes and should be your absolute first action in any new world.
Does the type of wood matter when making a crafting table in Minecraft PC?
No, the wood type makes no difference whatsoever. Oak, Birch, Spruce, Jungle, Acacia, Dark Oak, Mangrove, and Cherry wood all produce planks that work identically for this recipe. The resulting crafting table looks the same regardless of wood type — it will always have the same wooden texture and function in exactly the same way.
How do you pick up a crafting table in Minecraft PC after placing it?
Hold left-click while looking directly at the crafting table. After a short break animation, it will pop off the ground as a dropped item. Walk over it to automatically pick it up and return it to your inventory. Using an axe breaks it faster, but any method including bare hands works. The table is never destroyed — it always drops as a collectible item.
Why is nothing appearing in the output slot of my crafting table?
This usually means one of two things. Either your ingredient placement does not match the required pattern for the recipe you are attempting, or you do not have enough materials. Double-check the recipe pattern carefully — position matters in the 3×3 grid. Open the Recipe Book (the green book icon) to see the exact placement required for any recipe you have unlocked.
Conclusion — Four Wooden Planks That Start Everything
There is something quietly satisfying about making your very first crafting table in Minecraft. It is such a small thing — four planks, a two-by-two grid, a few seconds of your time. But the moment you place it on the ground and open that 3×3 interface, the entire game transforms in front of you.
Tools become possible. Shelter becomes buildable. That creeper heading toward you becomes a problem you can actually defend against. Your Minecraft story does not really start at the spawn point — it starts at the crafting table.
Here is a quick recap of everything you learned today:
- Step 1: Find any tree and punch a Wood Log free with your bare hands
- Step 2: Open your inventory with the E key
- Step 3: Place the Wood Log in your 2×2 crafting grid to get 4 Wood Planks
- Step 4: Fill all four slots of your 2×2 grid with one plank each to craft the Crafting Table
- Step 5: Place the table by right-clicking any surface, then right-click it to open and start crafting
That is it. That is the entire process. Under two minutes from nothing to fully equipped.
Now close this tab, open Minecraft, and go punch a tree. Your world is waiting — and now you know exactly what to do with it.
What was the first thing you ever crafted after placing your crafting table? Drop your answer in the comments — and if this guide helped you, share it with someone who is just starting out in Minecraft. The more the crafting community grows, the better. Now go build something incredible.