How to Take a Screenshot on PC (All Methods)
Table of Contents
You’re in the middle of something important. Maybe it’s a error message that just crashed your work. Maybe it’s a conversation you need to save. Maybe it’s a receipt, a funny moment in a video call, or a stat from a report that your boss needs right now.
You reach for that one key you half-remember — and suddenly you’re not sure what to do next. Did it save? Where did it go? Was that even the right button?
If that situation feels familiar, you’re not alone. Most PC users have been capturing screenshots the same way for years without realizing they’re missing faster, smarter, and more powerful options sitting right under their fingertips. This guide breaks down every single method — from the basics to the tools professionals actually use — so you never get caught off guard again.
By the time you finish reading, you’ll know exactly which method fits each situation, where your screenshots go, and how to get more out of this one simple skill.
Why Knowing All Screenshot Methods on PC Actually Matters
Most people learn one screenshot shortcut early on and stick with it forever. That works — until it doesn’t.
The truth is, different situations call for different approaches. Capturing a full webpage for a client presentation is not the same as grabbing a single error message. Screenshotting a gaming moment requires a different tool than annotating a document for your team.
When you know all your options, you stop wasting time fumbling around. You work faster, communicate more clearly, and look more competent doing it. Whether you’re a student, a remote worker, a content creator, or just someone who wants to stop losing important information — this guide was written for you.
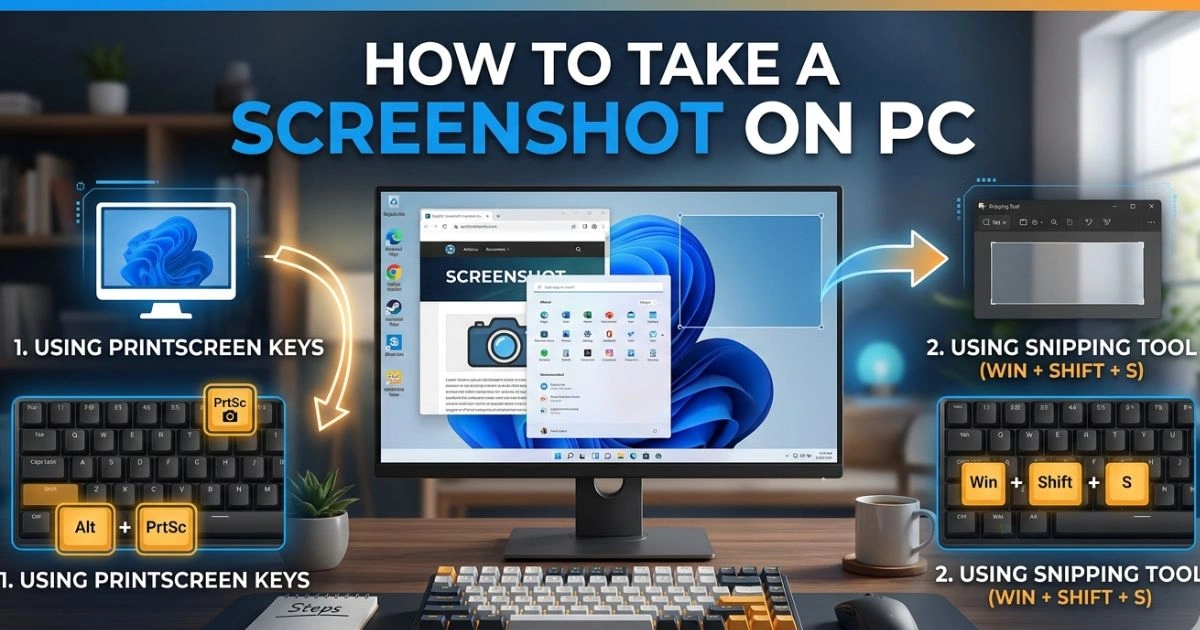
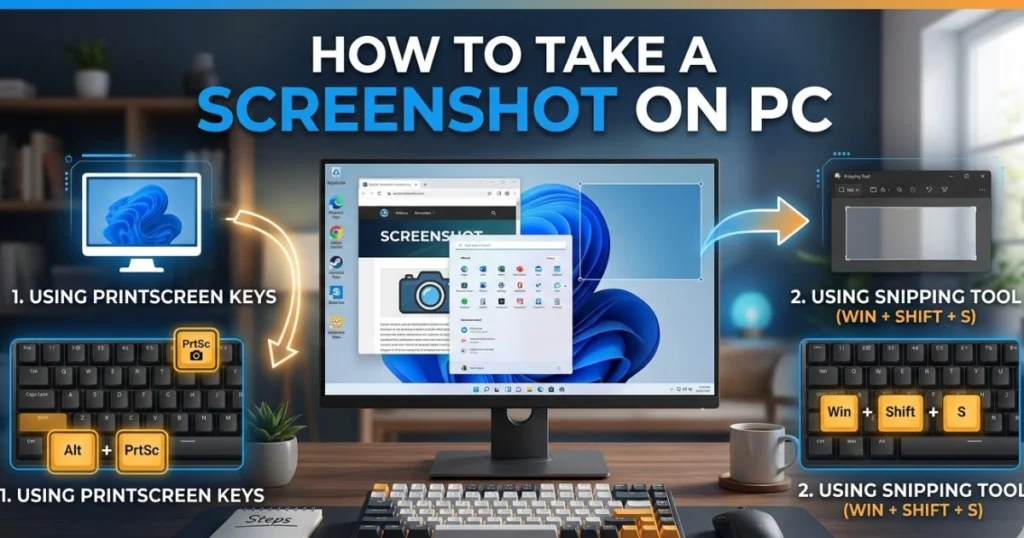
Method 1 — Capturing with the Print Screen (PrtSc) Key
What Is the Print Screen Key?
The Print Screen key — usually labeled PrtSc, PrtScn, or Print Scrn — sits near the top-right corner of most keyboards, often next to F12 or the Delete key. On laptops, you sometimes need to combine it with the Fn key to activate it.
At its core, this key copies a snapshot of your screen to your clipboard. That’s it. Nothing gets saved automatically — you have to paste it somewhere first.
How to Use Print Screen Step by Step
- Press PrtSc on your keyboard
- Open any app that accepts images — Paint, Word, Google Docs, even your email
- Press Ctrl + V to paste the screenshot
- Crop or edit as needed
- Save the file in your preferred format
It’s simple, but it comes with a catch: if you copy something else before pasting, your screenshot is gone. That’s why most experienced users have moved on to better shortcuts.
Print Screen Key Combinations You Should Know
| Shortcut | What It Does |
|---|---|
| PrtSc | Captures full screen to clipboard |
| Alt + PrtSc | Captures only the active window |
| Win + PrtSc | Saves screenshot automatically to Pictures > Screenshots |
| Win + Alt + PrtSc | Captures active window and saves via Xbox Game Bar |
The standout here is Win + PrtSc. It does everything PrtSc does, but saves the file automatically — no pasting required. Your screen will briefly dim to confirm the capture. Check your Pictures > Screenshots folder and it’ll be right there.
Method 2 — Windows Snipping Tool
What Is the Snipping Tool?
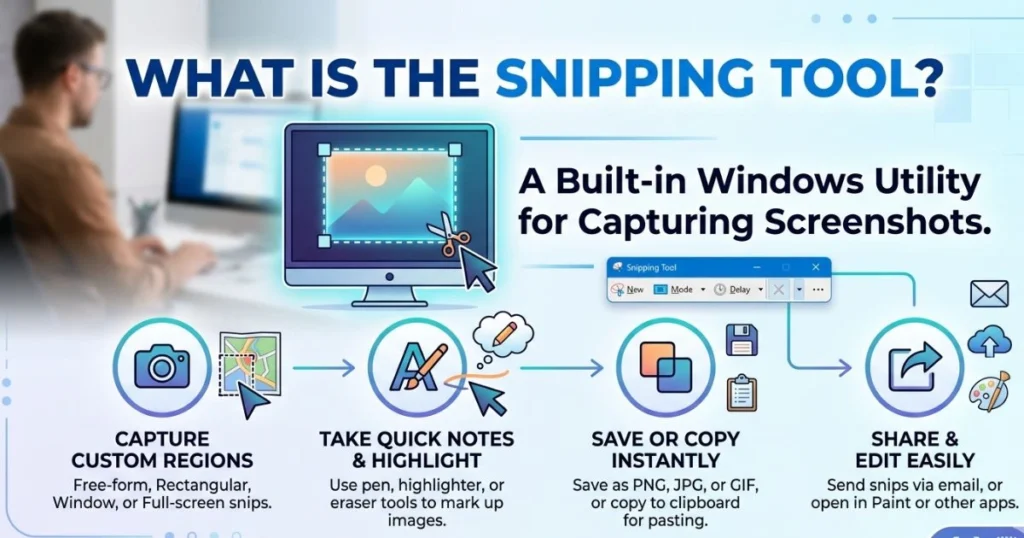
The Snipping Tool is a built-in Windows application that gives you much more control over what you capture. It comes pre-installed on Windows 10 and Windows 11, and Microsoft has been steadily improving it over the years.
If you’ve never used it, you’re leaving a genuinely useful tool untouched.
How to Open the Snipping Tool
There are two ways:
- Type “Snipping Tool” in the Start Menu search bar and open the app from the results.
- Press Win + Shift + S — this is the fast lane, no app-opening required
The Win + Shift + S shortcut is worth memorizing. Your screen dims immediately and a small toolbar appears at the top, ready for you to select what you want to capture.
The 4 Snip Modes Explained
Once you open Snipping Tool or press Win + Shift + S, you get four capture modes:
- Rectangular Snip — click and drag to select any rectangular area. This is the most commonly used mode.
- Freeform Snip — draw any shape you want around the area. Useful for irregular selections.
- Window Snip — click on any open window to capture it cleanly, without background clutter.
- Full-Screen Snip — captures everything on your screen in one shot.
How to Annotate and Save Your Snip
After capturing, Snipping Tool opens a small preview window. From there you can:
- Draw on the image using the pen tool
- Highlight specific areas with the highlighter
- Erase mistakes
- Save as PNG, JPG, or GIF
- Copy to clipboard or share directly via email or other apps
This makes it far more versatile than the basic PrtSc approach, especially when you need to mark something up before sending it.
Method 3 — Win + Shift + S: The Fastest Daily Shortcut
If you only take one thing from this entire guide, make it this shortcut: Win + Shift + S.
Why This Is the Method Most People Should Use Every Day
- No app needs to be open beforehand
- Your screen dims instantly and the snip toolbar appears
- You select your area, and the screenshot goes straight to your clipboard
- A notification pops up in the corner — click it to annotate, crop, or save
It’s the perfect balance between speed and control. You don’t need to reach for a third-party tool for most everyday captures. This shortcut handles 90% of use cases smoothly and quickly.
Step-by-Step Breakdown
- Press Win + Shift + S from anywhere on your PC
- Your screen darkens slightly
- A four-icon toolbar appears at the top center of your screen
- Choose your snip type — rectangular, freeform, window, or full screen
- Drag to make your selection
- The capture is copied to your clipboard automatically
- A notification appears — click it to open in Snipping Tool for editing and saving
If you skip the notification, the screenshot stays on your clipboard until you paste it somewhere.
Method 4 — Xbox Game Bar (The Best Option for Gamers)
What Is Xbox Game Bar?
Xbox Game Bar is a built-in overlay feature available in Windows 10 and Windows 11. Microsoft designed it with gamers in mind, but it works across most applications — not just games.
Beyond screenshots, it also handles screen recording, audio monitoring, and performance stats. For anyone who streams, creates tutorials, or games regularly, this tool is already on your PC and ready to use.
How to Capture a Screenshot Using Xbox Game Bar
- Press Win + G to open the Game Bar overlay
- Click the camera icon in the Capture widget
- Or skip the overlay entirely and press Win + Alt + PrtSc directly
- Your screenshot is saved automatically — no prompts, no clipboard step
Saved screenshots go to: This PC > Videos > Captures
Xbox Game Bar — Pros and Cons
| Pros | Cons |
|---|---|
| Auto-saves every screenshot | Doesn’t work on the Desktop itself |
| No clipboard dependency | Can feel heavy to open for simple tasks |
| Captures video clips too | Requires Game Bar to be enabled in Settings |
| Clean, timestamped file names | Not ideal for annotating |
If you’re a gamer or you create screen-recorded content, this method is worth having in your rotation. For everything else, Win + Shift + S is still faster.
Method 5 — Third-Party Screenshot Tools for PC
Sometimes the built-in tools simply aren’t enough. If you take screenshots frequently for work, create tutorials, document bugs, or need scrolling captures, a third-party tool will save you hours every week.
Best Free and Paid Screenshot Tools for PC
| Tool | Best For | Standout Feature |
|---|---|---|
| Lightshot | Quick sharing | Instant web upload with a shareable link |
| Greenshot | Professional use | Rich annotation + multiple export options |
| ShareX | Power users | Scrolling capture, automation, cloud upload |
| Snagit (Paid) | Teams and educators | Combined video and image capture suite |
| Flameshot | Open-source fans | Lightweight with solid annotation tools |
How to Use Lightshot — A Quick Walkthrough
Lightshot is one of the most popular free screenshot tools available, and for good reason. Here’s how it works:
- Download and install Lightshot from its official website
- Once installed, pressing PrtSc activates Lightshot instead of the default Windows behavior
- Your screen dims — drag to select the area you want
- A small toolbar appears with options to draw, add text, or highlight
- Click the cloud icon to upload instantly and get a shareable link
- Or save locally as a PNG or JPG
When Should You Switch to a Third-Party Tool?
Here’s a practical breakdown of when upgrading makes sense:
- You need scrolling screenshots — capturing a full webpage or long document
- You share screenshots regularly — tools like Lightshot generate instant links
- You annotate frequently — arrows, text boxes, blurs for sensitive info
- You automate workflows — ShareX can auto-upload and rename files
- You need video + screenshot together — Snagit handles both seamlessly
Method 6 — Scrolling Screenshots on PC (Capture Full Pages)
The Problem With Windows’ Native Tools
Here’s a limitation most people hit eventually: Windows’ built-in screenshot tools only capture what’s visible on your screen. Scroll down? That part isn’t in the image.
For capturing a full webpage, a long email thread, or an extended document, you need either a third-party desktop tool or a browser-level solution.
Best Tools for Scrolling Screenshots
- ShareX — completely free, open source, and one of the most powerful screenshot tools available. Its scrolling capture mode works on most applications and browsers.
- Snagit — premium option with a polished scrolling capture that’s reliable across virtually all apps.
- Browser extensions — for web pages specifically, these are often the easiest route.
How to Capture a Full-Page Screenshot in Chrome (No Extensions Needed)
This is one of the most underused tricks in Chrome:
- Open the webpage you want to capture
- Press F12 to open Chrome DevTools
- Press Ctrl + Shift + P to open the command palette
- Type “screenshot” in the search box
- Select “Capture full size screenshot”
- Chrome saves the full-page image directly to your Downloads folder
No extension, no third-party software, no cost. Just Chrome doing the heavy lifting.
Browser Extensions Worth Installing
| Extension | Browser | What It Does |
|---|---|---|
| GoFullPage | Chrome | One-click full-page capture |
| FireShot | Firefox / Chrome | Full page + annotations |
| Awesome Screenshot | Chrome / Edge | Screenshot + screen recording |
Method 7 — Screenshot on PC Without a Keyboard
Not everyone has access to a full keyboard at all times. Whether you’re on a touch-enabled Windows device, using an on-screen keyboard, or your PrtSc key has decided to stop cooperating — there are still options.
Using the On-Screen Keyboard
- Go to Settings > Accessibility > Keyboard
- Turn on the On-Screen Keyboard
- The virtual keyboard appears on your screen
- Click the PrtScn button to capture your screen to clipboard
- Paste into any app and save
Using Hardware Buttons on Windows Tablets
If you’re on a Microsoft Surface or another Windows tablet:
- Press and hold the Windows logo button on the device + press the Volume Down button
- The screen dims briefly and the screenshot saves automatically to Pictures > Screenshots
This mirrors the behavior of smartphones and makes it intuitive for tablet users who don’t have a physical keyboard nearby.
Where Are My Screenshots Saved on PC?
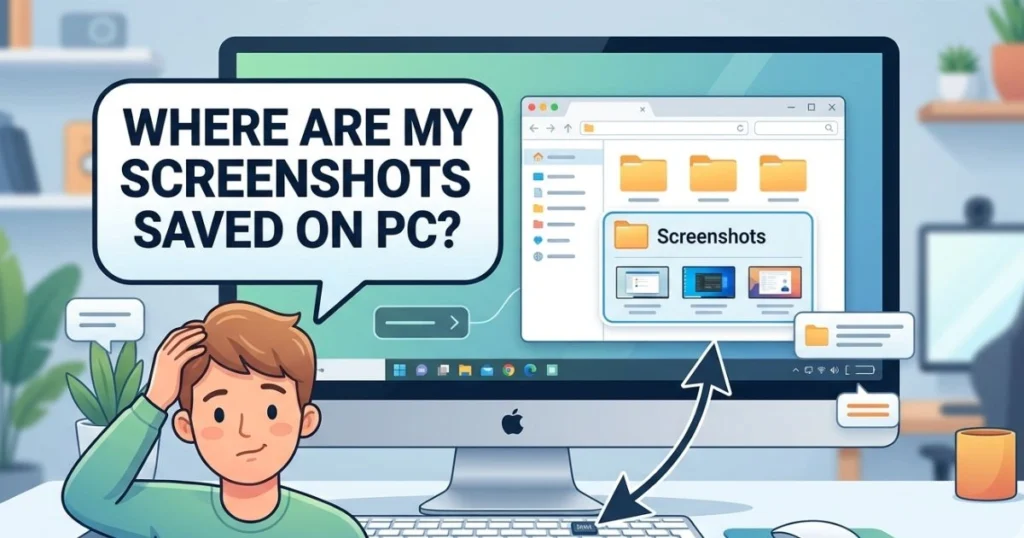
This is one of the most common questions people ask — and understandably so, since different methods save files to different places.
Default Save Locations by Method
| Method | Save Location |
|---|---|
| Win + PrtSc | Pictures > Screenshots |
| Snipping Tool (manual save) | Wherever you choose to save |
| Xbox Game Bar | Videos > Captures |
| Lightshot | Custom folder or cloud link |
| ShareX | Custom folder (configurable) |
| Chrome DevTools | Downloads folder |
| Windows tablet buttons | Pictures > Screenshots |
How to Change Your Default Screenshot Save Folder
If you want all your Win + PrtSc screenshots to save somewhere specific:
- Open File Explorer
- Navigate to Pictures > Screenshots
- Right-click the Screenshots folder
- Select Properties
- Go to the Location tab
- Click Move and choose your preferred folder
- Click Apply — done
From that point on, every Win + PrtSc screenshot lands exactly where you want it.
Full Method Comparison — How to Take a Screenshot on PC
| Method | Speed | Auto-Saves | Annotation | Best For |
|---|---|---|---|---|
| PrtSc | Fast | No | No | Quick clipboard copy |
| Win + PrtSc | Fast | Yes | No | Instant full-screen save |
| Win + Shift + S | Fastest | Clipboard only | Yes | Everyday partial captures |
| Snipping Tool | Moderate | Yes | Yes | Controlled, annotated captures |
| Xbox Game Bar | Moderate | Yes | No | Gaming and screen recording |
| Lightshot | Fast | Yes | Yes | Sharing with links |
| ShareX | Fast | Yes | Yes | Power users and automation |
| Chrome DevTools | Moderate | Yes | No | Full webpage captures |
Pro Tips for Better Screenshots on PC
A few habits that separate casual users from people who actually have their screenshot workflow dialed in:
- Make Win + Shift + S your default habit. It works everywhere, gives you control over what you capture, and doesn’t require any app to be open.
- Name your files immediately. “Screenshot (147).png” tells you nothing three weeks later.
- Use annotation before you share. A quick arrow or highlight makes your screenshot 10x more useful to whoever receives it.
- Blur sensitive information. Tools like Greenshot and ShareX let you redact private data before sharing. Get into this habit.
- Create organized folders by project or date. Screenshots pile up fast. A folder system saves you from endless scrolling through hundreds of files.
- Use ShareX if you’re doing this professionally. The learning curve is real, but the automation features — auto-naming, auto-uploading, workflow triggers — pay off quickly.
FAQ — How to Take a Screenshot on PC
What is the fastest way to take a screenshot on PC?
The fastest method is Win + Shift + S. It activates immediately from anywhere on your PC, lets you select exactly what you want to capture, and copies it to your clipboard in seconds — no apps required.
How do I take a screenshot on PC and save it automatically?
Press Win + PrtSc. Your screen will briefly dim to confirm the capture, and the screenshot saves automatically to Pictures > Screenshots without any extra steps.
How do I screenshot only one window on PC?
Click on the window you want to make it active, then press Alt + PrtSc. This copies just that window to your clipboard. Paste it into Paint or any other app to save it.
How do I take a screenshot on PC without the Print Screen key?
Use Win + Shift + S to open the Snipping Tool overlay — no PrtSc key needed. Alternatively, use a third-party tool like Lightshot or ShareX, both of which use their own keyboard shortcuts.
Can I take a scrolling screenshot on PC?
Not with Windows’ native tools. For scrolling captures, use ShareX (free), Snagit (paid), or the Chrome DevTools full-size screenshot method for web pages.
Where are my screenshots saved on PC?
It depends on the method you used. Win + PrtSc saves to Pictures > Screenshots. Xbox Game Bar saves to Videos > Captures. Snipping Tool asks where to save manually. Third-party tools use their own configurable folders.
Do I need to install anything to take a screenshot on PC?
No. Windows has multiple built-in methods — PrtSc, Win + PrtSc, Win + Shift + S, Snipping Tool, and Xbox Game Bar. You only need third-party software if you require features like scrolling capture, automatic cloud upload, or advanced annotation.
Why does my PrtSc key not take a screenshot?
On some laptops, PrtSc is a secondary function and requires pressing Fn + PrtSc together. If that doesn’t work, check your keyboard settings or use Win + Shift + S as an alternative.
Conclusion — You Now Have Every Screenshot Method You’ll Ever Need
Taking a screenshot on PC is one of those skills that sounds simple — until you need to do something slightly beyond the basics and realize you don’t know how.
Now you do.
You’ve got seven distinct methods, each suited to a different situation. For everyday use, Win + Shift + S will handle most of what you need quickly and cleanly. When you need to capture a full webpage, ShareX or Chrome DevTools steps in. For gaming, Xbox Game Bar is already waiting for you. And when you need professional annotation and sharing, tools like Lightshot and Greenshot fill that gap perfectly.
The key from here is to pick two or three methods that match how you actually work — and practice them until they become automatic. You’ll be surprised how much faster your workflow gets when you stop fumbling with screenshots and start capturing exactly what you need, every single time.
Found this guide useful? Bookmark it for reference, share it with a colleague who still only knows the PrtSc key, and drop a comment below with the method you use most — or the one you’re going to try first. Your feedback helps make these guides better for everyone.