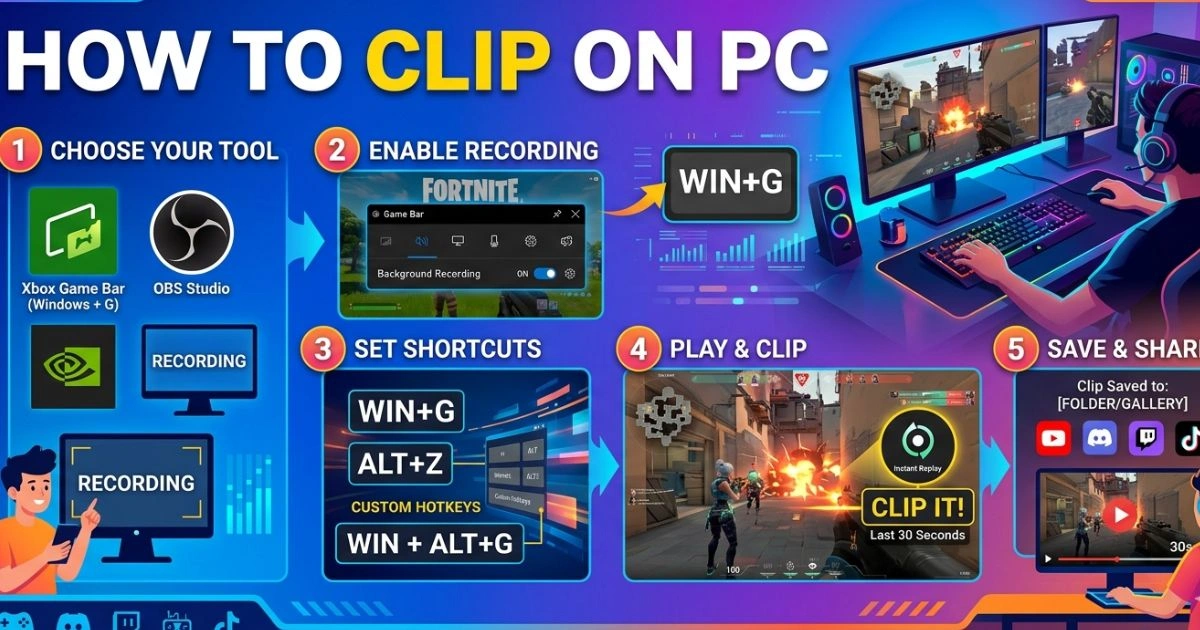
How to Clip on PC (Step-by-Step Beginner Guide)
Table of Contents
You just pulled off the most insane play of your life.
Your hands are shaking. Your teammates are losing their minds in voice chat. And then — nothing. No replay. No saved footage. Just a memory that fades a little more every hour until it becomes one of those “you had to be there” stories nobody fully believes.
That moment has happened to almost every gamer at least once. And it is genuinely one of the most frustrating feelings in gaming — not the loss, not the lag, but the missed capture of something truly worth keeping.
Learning how to clip on PC is not just a technical skill. It is how you take ownership of your best moments, build your content library from scratch, and — if that is your goal — start the journey toward becoming a creator people actually follow. This guide walks you through every method, every step, and every setting so your next incredible moment gets saved, no matter what.
What Does “Clipping” Mean on PC?
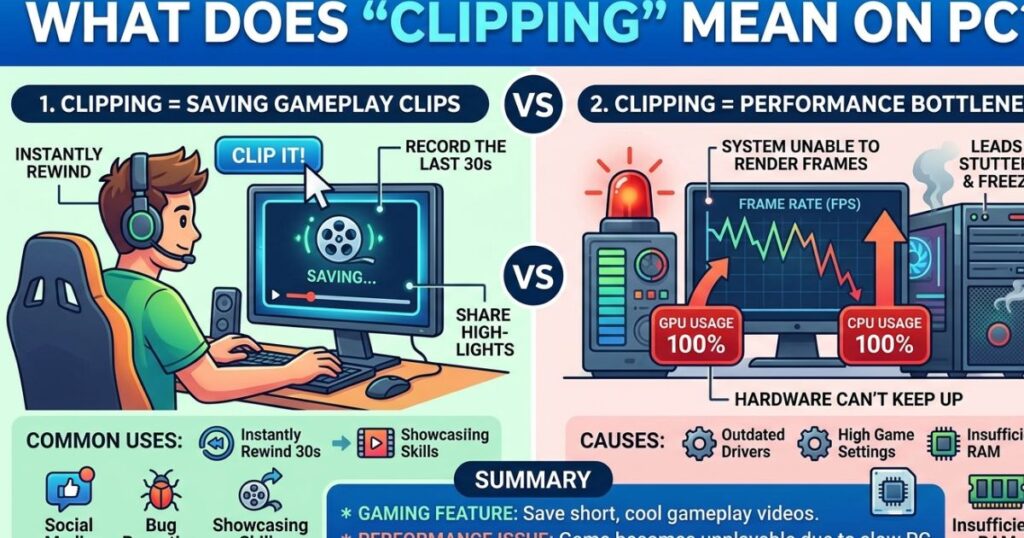
Before jumping into tools and hotkeys, it helps to understand exactly what clipping means in this context.
A clip is a short video recording of something that happened on your screen — usually a standout moment in a game, a funny interaction, or an impressive play. Unlike a screenshot, which captures a single frozen frame, a clip captures motion, sound, and the full sequence of what happened.
There are two main approaches to clipping:
- Manual recording — you start and stop the recording yourself around the moment you want to save
- Instant replay / buffer recording — the software continuously records in the background, and you press a hotkey after the moment happens to save the last 30 seconds, 2 minutes, or however long you set
That second method is the one most experienced clippers rely on, because the best moments almost never announce themselves in advance.
What You Need Before You Start Clipping on PC
Minimum System Requirements for Clipping
Your PC does not need to be a powerhouse to record clips, but a few baseline specs will keep things smooth:
- CPU: Intel Core i5 (8th gen+) or AMD Ryzen 5 equivalent
- GPU: NVIDIA GTX 1060 / AMD RX 580 or better (important for hardware encoding)
- RAM: 8GB minimum, 16GB recommended
- Storage: At least 10–20GB of free space for clip output; SSD preferred for faster write speeds
If your system is on the lower end, do not worry — software like Xbox Game Bar and Medal.tv are lightweight and designed to run on modest hardware without tanking your frame rate.
Choosing the Right Clipping Method for You
| Method | Best For | Cost | Ease of Use |
|---|---|---|---|
| Xbox Game Bar | Casual beginners | Free (built-in) | Very Easy |
| NVIDIA ShadowPlay | NVIDIA GPU users | Free | Easy |
| AMD ReLive | AMD GPU users | Free | Easy |
| OBS Studio | Advanced users / streamers | Free | Moderate |
| Medal.tv | Quick sharing & highlights | Free / Premium | Very Easy |
| Clipchamp | Editing after recording | Free (built-in) | Easy |
Your GPU brand and how you plan to use your clips should be the two main factors guiding your choice here.
How to Clip on PC Using Xbox Game Bar
If your PC runs Windows 10 or Windows 11, you already have a clipping tool installed. Xbox Game Bar requires zero downloads, zero accounts, and works with most games and apps right out of the box.
Step 1 — Enable Xbox Game Bar on Windows
- Open Settings (Win + I)
- Go to Gaming → Xbox Game Bar
- Make sure the toggle is switched ON
That is all it takes to activate it. By default, it is already enabled on most Windows installations, so you may not even need to do anything.
Step 2 — Learn the Essential Keyboard Shortcuts
These shortcuts are what you will actually use during gameplay, so it is worth memorizing at least the two or three most important ones:
| Action | Shortcut |
|---|---|
| Open Game Bar Overlay | Win + G |
| Start / Stop Recording | Win + Alt + R |
| Save Last 30 Seconds | Win + Alt + G |
| Take a Screenshot | Win + Alt + PrtScn |
| Show Recording Timer | Win + Alt + T |
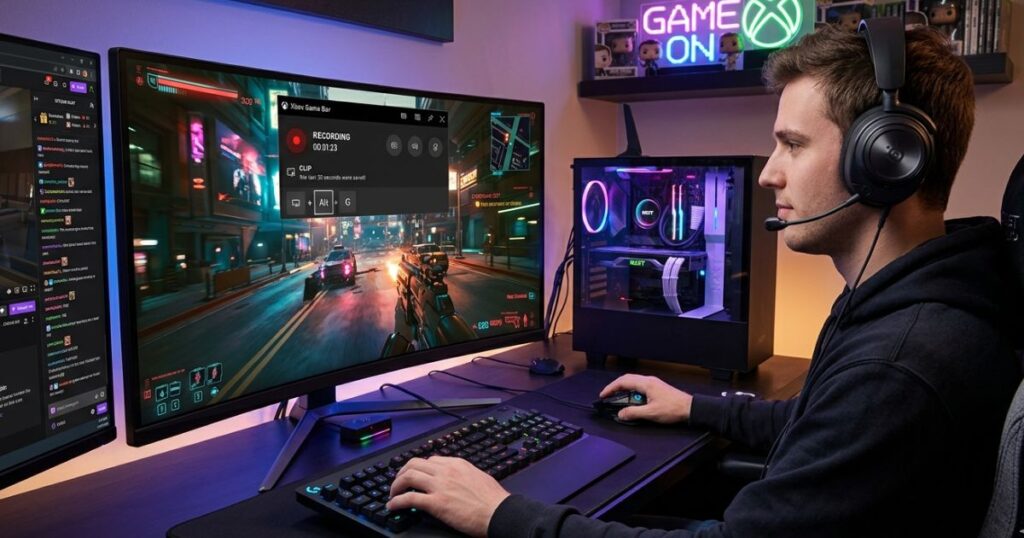
The Win + Alt + G shortcut is the one that works like instant replay — you press it after something great happens, and it saves the previous 30 seconds as a clip automatically.
Step 3 — Record Your First Clip
- Launch your game and start playing
- When something worth saving happens, press Win + Alt + G immediately after
- A notification will appear confirming the clip was saved
- Alternatively, press Win + Alt + R before a moment to manually start and stop recording
Step 4 — Find and Manage Your Saved Clips
Your clips are saved by default to: C:\Users\[YourName]\Videos\Captures
You can change this location in Settings → System → Storage → Change where new content is saved. All clips are exported as MP4 files, which are widely compatible across editing tools and sharing platforms.
How to Clip on PC with NVIDIA ShadowPlay
If your PC runs an NVIDIA graphics card, ShadowPlay — built into the GeForce Experience app — gives you one of the cleanest, lowest-impact clipping experiences available. It uses your GPU to handle the recording rather than your CPU, which means your frame rate barely takes a hit even while recording at 1080p 60fps.
Step 1 — Download and install NVIDIA GeForce Experience.
Head to NVIDIA’s official website and download GeForce Experience. Install it, log in or create a free account, and let it detect your GPU and games automatically.
Step 2 — Enable Instant Replay in ShadowPlay
- Press Alt + Z in-game to open the GeForce Experience overlay
- Click Instant Replay
- Set your buffer duration (how far back you want it to remember — 1 to 20 minutes)
- Click Turn On
Once Instant Replay is running, ShadowPlay silently records in the background at all times. You never have to think about it — just play.
Step 3 — Clip Your Best Moments
| Action | Shortcut |
|---|---|
| Save Instant Replay | Alt + F10 |
| Start / Stop Manual Record | Alt + F9 |
| Take Screenshot | Alt + F1 |
| Open Overlay | Alt + Z |
Press Alt + F10 right after a great play and ShadowPlay saves the last X minutes to your hard drive instantly. No lag, no interruption, no fuss.
Step 4 — Customize Your Clip Settings
Inside the GeForce Experience overlay under Settings → Video Capture, you can adjust:
- Resolution — up to 4K depending on your GPU
- Frame Rate — 30fps, 60fps, or higher
- Bitrate — higher bitrate = better quality but larger file size (50 Mbps is a solid starting point for 1080p)
- Audio — choose between game audio only, mic only, or both combined
How to Clip on PC with AMD ReLive
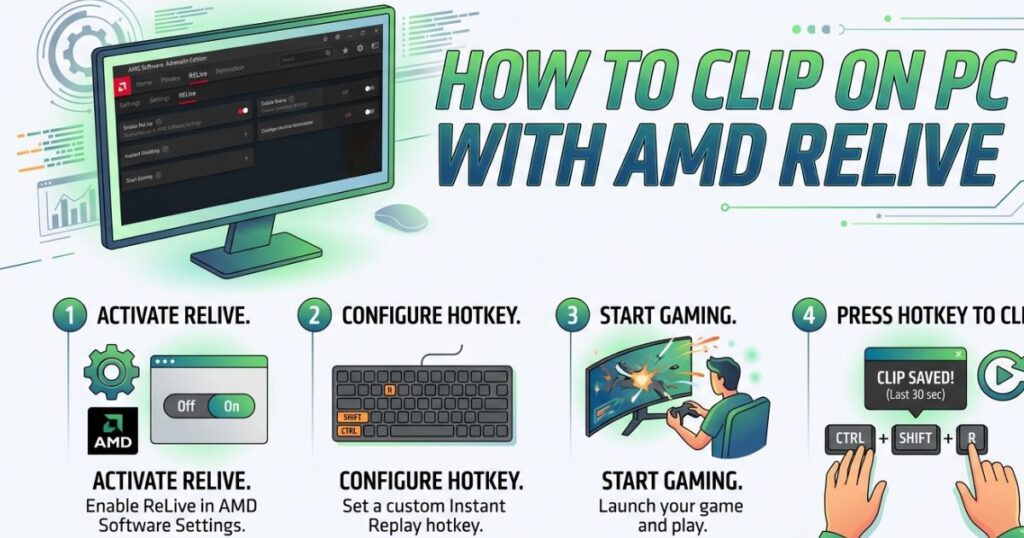
AMD users have their own built-in solution through Radeon Software, called ReLive. It works on the same principle as ShadowPlay — hardware-accelerated recording that keeps performance impact minimal.
Step 1 — Enable AMD ReLive in Radeon Software
- Right-click on your desktop and launch AMD Radeon Software.
- Navigate to the Recording or ReLive section
- Toggle ReLive to ON
- Restart your PC if prompted
Step 2 — Configure Instant Replay
- Set your replay buffer duration (how many minutes to keep in memory)
- Choose your video quality (resolution and bitrate)
- Assign custom hotkeys if the defaults do not suit you
Step 3 — Save Your Clips
| Action | Default Hotkey |
|---|---|
| Save Instant Replay | Ctrl + Shift + S |
| Start / Stop Recording | Ctrl + Shift + R |
| Take Screenshot | Ctrl + Shift + E |
Clips are saved as MP4 files and the output folder is customizable within the Radeon Software settings.
How to Clip on PC Using OBS Studio
OBS Studio is the tool serious creators and streamers turn to when they want full control. It is free, open-source, and endlessly customizable — but it does come with a slightly steeper learning curve than the other options on this list.
Step 1 — Download and Install OBS Studio
Go to obsproject.com and download the version for your operating system (Windows, Mac, or Linux). The installation is straightforward — follow the setup wizard and let OBS configure basic settings automatically when it launches for the first time.
Step 2 — Set Up a Scene for Game Capture
- In the Scenes panel, click the + icon to create a new scene
- In the Sources panel, click + and choose:
- Game Capture — captures a specific game only (best performance)
- Display Capture — captures your entire screen (works with everything)
- Preview your capture in the main window to confirm it is working
Step 3 — Configure Recording Settings
Go to Settings → Output → Recording and set:
| Setting | Recommended Value |
|---|---|
| Recording Format | MKV (convert to MP4 after) |
| Encoder | Hardware (NVENC / AMD AMF) |
| Resolution | 1920×1080 or 2560×1440 |
| Frame Rate | 60 FPS |
| Bitrate | 40,000–80,000 Kbps for high quality |
Using MKV format is a small pro tip — if OBS crashes mid-recording, MKV files can still be recovered, whereas MP4 files may be lost. You can remux MKV to MP4 inside OBS under File → Remux Recordings at any time.
Step 4 — Enable Replay Buffer for Instant Clips
This is OBS’s version of instant replay:
- Navigate to Settings → Output → Replay Buffer.
- Enable it and set the buffer length (60–120 seconds is common)
- Assign a hotkey to Save Replay Buffer (default is F12)
- Click Start Replay Buffer before your session
When something clip-worthy happens, hit your hotkey and the last X seconds are saved automatically.
How to Clip on PC with Medal.tv
If your main goal is to clip and share — to Discord, social media, or a gaming community — Medal.tv might be the smoothest experience on this list. It handles the recording, the editing, and the sharing all in one place.
What Makes Medal.tv Stand Out for Beginners
- Automatically recognizes when you start a supported game.
- Lets you trim and caption clips inside the app
- Has a built-in community feed where other players see your highlights
- Free tier includes solid clip quality with no watermark
Step 1 — Download and Set Up Medal.tv
Visit medal.tv, download the desktop app, and create a free account. Once installed, Medal runs in the background and auto-detects most popular games.
Step 2 — Configure Your Clip Settings
Inside Medal’s settings:
- Choose clip length — from 15 seconds up to 5 minutes on the free plan
- Set your hotkey to save clips (default is F8)
- Enable or disable auto-detection per game
Step 3 — Save, Edit, and Share
- Press your hotkey mid-game to save the last X seconds
- Open Medal’s clip editor to trim, add captions, or overlay music
- Share directly to Discord, Twitter/X, TikTok, or your Medal profile page with one click
How to Edit Your Clips After Recording
Saving a raw clip is only the beginning. A quick edit can be the difference between something you privately keep and something people actually rewatch.
Quick Edits with Windows Clipchamp
Clipchamp is built into Windows 11 and available for free on Windows 10. It handles the basics cleanly:
- Trim the start and end of your clip
- Add text overlays or captions
- Adjust volume or mute audio
- Export in MP4
For most casual clipping needs, Clipchamp is more than enough.
Free Third-Party Editors Worth Knowing
| Tool | Best For | Platform |
|---|---|---|
| DaVinci Resolve | Professional-level editing | Windows / Mac |
| Shotcut | Lightweight free editing | Windows / Mac / Linux |
| CapCut | Fast edits for social media | Windows / Web |
| Kdenlive | Open-source advanced editing | Windows / Linux |
How to Share Your PC Clips Like a Pro
Once your clip is trimmed and ready, here is where each platform works best:
- YouTube — best for longer highlights, montages, or tutorial clips
- Discord — drag and drop MP4 files directly into any server channel (keep files under 25MB for free accounts)
- TikTok / Instagram Reels — crop to vertical (9:16 ratio) for maximum reach
- Medal.tv — best for gaming-specific audiences who already care about highlights
- Twitter/X — short clips under 2 minutes perform best; captions help engagement
If your file is too large to upload, use Handbrake (free) to compress it without losing visible quality. A 1080p clip at 30fps can typically be reduced to under 50MB without any noticeable difference.
Common Problems When Clipping on PC and How to Fix Them
Clip is a Black Screen
- Switch your game to Windowed Borderless mode instead of exclusive fullscreen
- In OBS, switch from Game Capture to Display Capture
- Update your GPU drivers — outdated drivers cause this constantly
No Audio in Your Clip
- Check that the correct audio device is selected inside your clipping software
- In OBS, confirm your Desktop Audio source is active in the audio mixer
- Some games have audio protection that blocks recording — try OBS’s application audio capture instead
PC Lags While Recording
- Enable hardware encoding (NVENC for NVIDIA, AMF for AMD) instead of software/CPU encoding
- Lower in-game settings by one step while recording
- Close background applications (browsers, Discord overlay, etc.) to free up RAM
Clips Are Nowhere to Be Found
- Search
*.mp4in Windows Explorer to locate all video files - Check each software’s designated output folder in its settings
- Confirm your storage drive is not full — a full drive silently fails to save files
Tips to Get Better at Clipping on PC
These habits separate people who sometimes get clips from people who never miss a moment:
- Keep Instant Replay running at all times — you cannot predict when a great moment will happen
- Use one consistent hotkey across all software — muscle memory works better than thinking
- Organize clips into folders by game and date — future-you will be grateful
- Back up important clips to Google Drive, OneDrive, or an external hard drive
- Watch your own clips — they reveal patterns in your gameplay that no coach ever could
- Review your clip quality settings monthly — as your storage grows, you may want to adjust bitrate or resolution
Conclusion — Your First Clip Is One Keystroke Away
You now have everything you need to know about how to clip on PC — from the simplest zero-setup option with Xbox Game Bar, to the polished performance of NVIDIA ShadowPlay, to the full creative control of OBS Studio.
There is no perfect tool for everyone, but there is definitely a right tool for you — and now you know how to find it, set it up, and actually use it when it counts.
Your next great moment is coming. The only question is whether you will have something to show for it.
Pick one method from this guide, set it up today, and get your hotkey ready. Because that moment? It is closer than you think.
FAQ — How to Clip on PC
How do I clip on PC without any software? You do not need to download anything. Windows 10 and 11 both include Xbox Game Bar. Press Win + G to open the overlay, then Win + Alt + G to save the last 30 seconds of gameplay instantly.
How to clip on PC for free? Every major clipping option — Xbox Game Bar, NVIDIA ShadowPlay, AMD ReLive, OBS Studio, and Medal.tv — is completely free to use with no watermark on your clips.
What is the best clipping software on PC for beginners? Xbox Game Bar requires the least setup and is already installed on your system. Medal.tv is the best choice if you also want to share clips easily with a community or on social platforms.
How to clip on PC while playing any game? Use Display Capture in OBS or the Xbox Game Bar — both capture everything visible on your screen regardless of which game you are playing.
How long can a clip be on PC? Xbox Game Bar supports recordings up to 30 minutes. OBS has no hard cap. Medal.tv on the free plan allows clips up to 5 minutes long, with longer options on paid tiers.
Where are my clips saved on PC? Xbox Game Bar saves to C:\Users\[YourName]\Videos\Captures by default. Every tool lets you change this in settings. If you cannot find a clip, search *.mp4 in Windows Explorer.
How to clip on PC without causing lag? Turn on hardware encoding in your software settings — NVENC for NVIDIA cards, AMF for AMD cards. This shifts the recording workload from your CPU to your GPU, which keeps your frame rate stable during capture.