
How to Make a Armor Stand in Minecraft PC (Step-by-Step)
Table of Contents
You finally did it. After hours of mining, smelting, and surviving creeper ambushes, you pulled together a full set of diamond armor. Maybe it’s enchanted. Maybe it took three in-game days to complete. Either way, it’s sitting in a chest somewhere — buried under cobblestone and raw iron like it doesn’t matter.
It does matter. And it deserves better.
That’s exactly why armor stands exist in Minecraft. They give your gear a proper home, add serious character to your base, and honestly make your builds look like something you actually planned. Whether you’re setting up a trophy room, a medieval armory, or just want your enchanted gear on display while you’re off exploring — this guide walks you through everything, from gathering materials to advanced customization tricks most players never bother to learn.
Let’s get into it.
What Is an Armor Stand in Minecraft?
Overview and Purpose
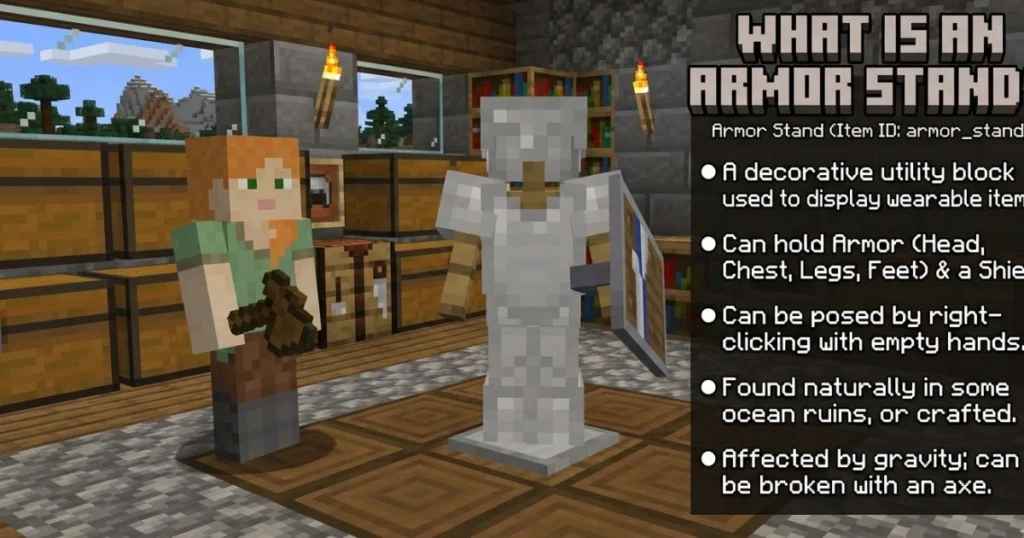
An armor stand is a wooden entity in Minecraft that holds and displays armor pieces and, in Java Edition, hand-held items too. It looks like a simple humanoid figure made of sticks, and while it sounds basic, it pulls a surprising amount of weight in terms of gameplay and aesthetics.
It’s not just decoration either. Armor stands function as entities, which means they interact with the game world differently than blocks do. That opens up possibilities for redstone builds, adventure maps, and even some clever inventory systems.
Why Every Minecraft PC Player Should Have One
If you’ve never bothered crafting one before, here’s why that changes today:
- ✅ It holds all four armor pieces at once — helmet, chestplate, leggings, boots
- ✅ In Java Edition, it can hold items in hand — swords, tools, even shields
- ✅ It’s fully poseable using commands — no other display block comes close
- ✅ It adds visual depth to any base or build — armories, entranceways, roleplay setups
- ✅ It’s lightweight — placing several won’t tank your game performance
Once you start using them, you’ll wonder how your base ever felt finished without one.
Materials You Need to Make an Armor Stand in Minecraft PC
Before you open a crafting table, you need two things: six sticks and one smooth stone slab. That’s it. Simple recipe, but the smooth stone slab trips people up more often than you’d think — because it has to be smooth stone, not regular stone, not cobblestone, not stone brick. Smooth. Stone. Slab.
Here’s a clean breakdown:
| Ingredient | Quantity | Where to Find It |
|---|---|---|
| Sticks | 6 | Craft from wooden planks, found in chests |
| Smooth Stone Slab | 1 | Smelt stone twice, then craft into slabs |
| Crafting Table | 1 | Needed to assemble the recipe |
How to Get Sticks
This one’s easy. Place two wooden planks vertically in your crafting grid — any wood type works — and you get four sticks per craft. You likely already have a stack sitting in your inventory. If not, chop any tree and break down the wood into planks first.
Sticks also show up in:
- Village blacksmith and library chests
- Dungeon and mineshaft chests
- Bonus chests at world spawn
You need six for the recipe, so grab more than enough before you start.
How to Get Smooth Stone Slabs
This is where most players get stuck, so pay attention here. The process involves two rounds of smelting, not one.
Step 1: Mine cobblestone with any pickaxe.
Step 2: Smelt the cobblestone in a furnace. This gives you regular stone.
Step 3: Smelt the regular stone again. This gives you smooth stone.
Step 4: Open your crafting table and place three smooth stone blocks in a horizontal row across the middle. This produces six smooth stone slabs.
You only need one slab for the armor stand recipe, so one smooth stone block smelted and crafted is more than enough. Keep the extras — they’re useful for building clean, modern-looking structures.
⚠️ Common mistake: Using regular stone slabs or cobblestone slabs. These will not work. The crafting recipe will not register unless the slab is specifically smooth stone.
How to Make an Armor Stand in Minecraft PC — Step-by-Step

You’ve got your sticks and your smooth stone slab. Now let’s put it together.
Step 1 — Open Your Crafting Table
Right-click your crafting table to pull up the 3×3 crafting grid. Make sure your sticks and smooth stone slab are in your inventory before you open it.
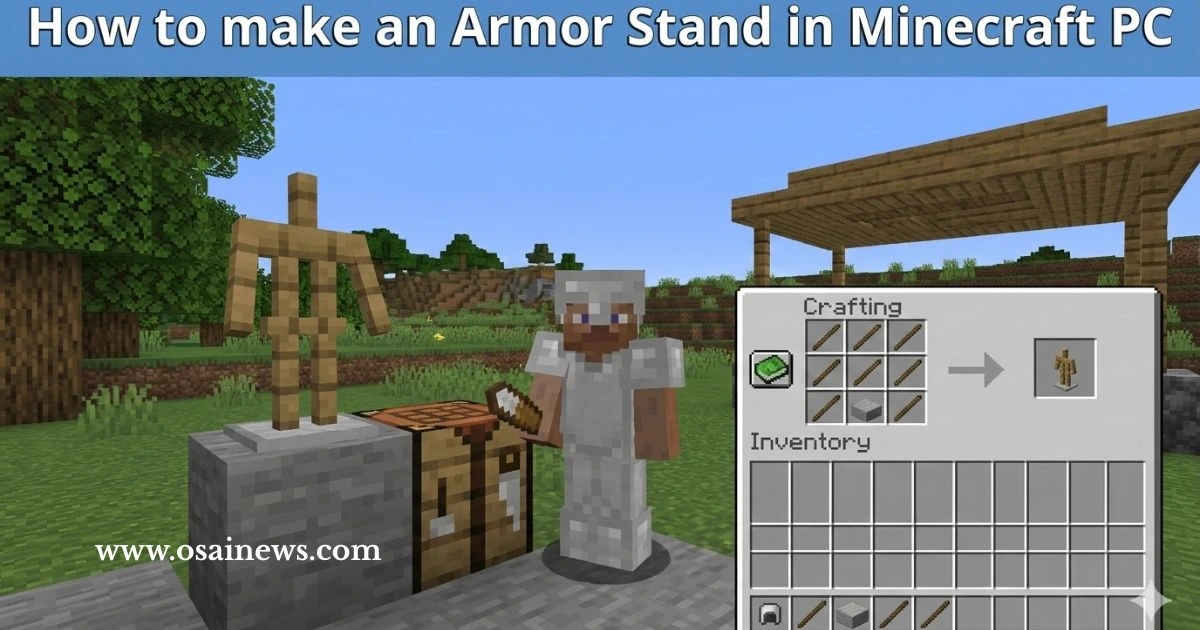
Step 2 — Place the Ingredients in the Correct Pattern
This part is critical. Minecraft crafting recipes are position-sensitive, so the layout has to match exactly.
| Crafting Grid | Column 1 | Column 2 | Column 3 |
|---|---|---|---|
| Row 1 | Stick | (empty) | Stick |
| Row 2 | (empty) | Stick | (empty) |
| Row 3 | Stick | Smooth Stone Slab | Stick |
Breaking it down:
- Row 1: Sticks in the far left and far right squares, middle square empty
- Row 2: Only the center square gets a stick
- Row 3: Sticks in the left and right squares, smooth stone slab in the center
If your layout matches this exactly, the armor stand will appear in the output slot on the right.
Step 3 — Transfer the Armor Stand into Your Inventory
Click the armor stand in the output slot and drag it to your inventory or hotbar. One craft produces one armor stand. If you want multiples, repeat the process — each stand requires the same six sticks and one smooth stone slab.
Step 4 — Place the Armor Stand in Your World
Select the armor stand from your hotbar, then right-click on any flat, solid surface to place it. The stand will appear upright, arms tucked to its sides (in Java Edition), ready to be loaded up with gear.
A few placement tips:
- Place it on a flat floor for clean positioning
- Avoid placing on stairs or slabs — it can look misaligned
- Indoors placement keeps it safe from player traffic and explosions
Step 5 — Equip Armor onto the Stand
Hold an armor piece in your hand and right-click the armor stand. It will automatically slot into the correct position based on what the piece is:
- Helmets → Head slot
- Chestplates → Chest slot
- Leggings → Legs slot
- Boots → Feet slot
- Any item → Hand slot (if arms are enabled in Java Edition)
To retrieve armor, right-click the stand with an empty hand. The piece will transfer back to your inventory.
How to Customize Your Armor Stand in Minecraft PC
Here’s where things get genuinely interesting. A basic armor stand is useful, but a customized armor stand is a whole different level of cool.
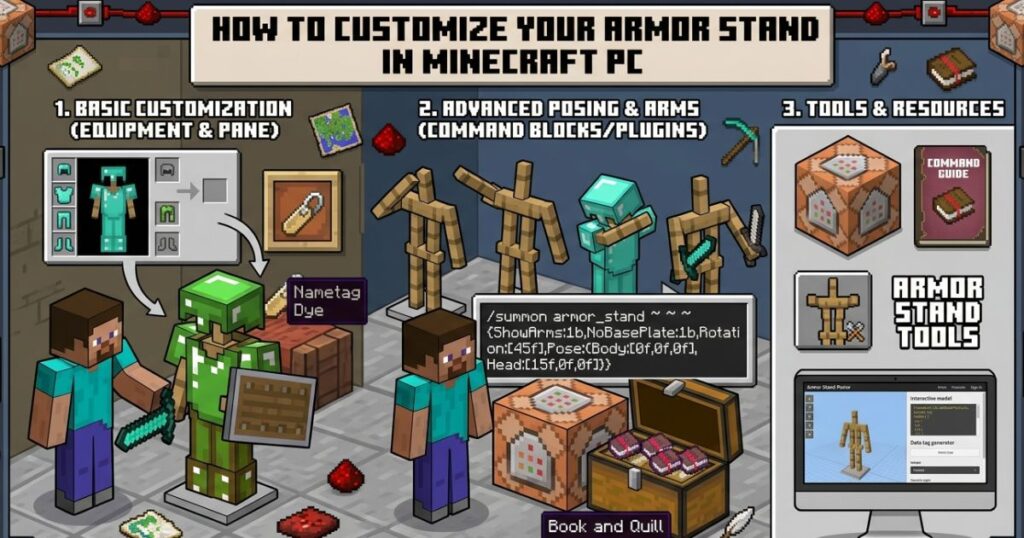
Using Commands to Pose Your Armor Stand
In Java Edition, armor stands support full pose customization through NBT (Named Binary Tag) commands. This requires cheats to be enabled in your world, or operator permissions on a server.
The basic structure of a pose command looks like this:
/data merge entity @e[type=armor_stand,limit=1] {Pose:{Head:[0f,0f,0f]}}
The three numbers represent rotation on the X, Y, and Z axes in degrees. You can apply poses to:
- Head
- Body
- LeftArm / RightArm
- LeftLeg / RightLeg
Rather than manually calculating every angle, use one of the many free armor stand pose generator tools available online. You paste in the values, it gives you the command — simple.
Some popular poses players use:
- Saluting knight
- Relaxed lean
- Combat-ready stance with sword raised
- Seated position for roleplay builds
Making an Invisible Armor Stand
Want floating armor with no visible stand underneath? This command handles it:
/summon armor_stand ~ ~ ~ {Invisible:1b}
This is a favorite trick for building cinematic scenes, haunted house maps, and any build where you want gear floating dramatically in space.
Giving Your Armor Stand a Name
Naming an armor stand serves two purposes — it personalizes it, and it also prevents the stand from being accidentally broken without intent (named entities feel more “real” and you’re less likely to swing at them carelessly).
Here’s how to name one:
- Find or craft a Name Tag (found in dungeon chests, mineshafts, fishing)
- Place the Name Tag in an Anvil along with the XP cost to rename it
- Type your desired name
- Right-click the armor stand with the renamed Name Tag in hand
The name will now float above the stand whenever you look at it.
Enabling Arms on Your Armor Stand (Java Edition)
By default, Java Edition armor stands have no visible arms — just stumps. To enable full arms and allow the stand to hold items visibly, run this command:
/data merge entity @e[type=armor_stand,limit=1] {ShowArms:1b}
Once arms are showing, you can right-click the stand while holding any item and it will grip it in its hand. Swords, bows, lanterns, shields — anything goes.
Armor Stand Tips, Tricks and Redstone Uses
Using Armor Stands in Redstone Contraptions
Because armor stands are entities rather than blocks, they trigger certain redstone inputs that regular blocks cannot. This makes them surprisingly useful in technical builds.
Some practical applications:
- Tripwire hooks will activate when an armor stand crosses the line — useful for automated doors
- Pressure plates detect armor stand weight — build a system where removing armor from a stand opens a hidden passage
- Dispensers can automatically equip or strip armor from stands — build an auto-armoring station before you head into battle
- Adventure maps use armor stands as interactive NPCs, guards, or display dummies
If you’re into redstone engineering, spending time with armor stands opens up builds that would be impossible otherwise.
Protecting Your Armor Stand
Armor stands are tougher than they look but they’re not invincible. They can be destroyed by:
- Direct player hits (two-handed attack breaks it instantly)
- Explosions (TNT, creepers, ghast fireballs)
- Falling anvils
- Suffocation inside blocks
To keep your stands safe:
- Enclose them in glass display cases — looks great and blocks most damage
- Use barrier blocks in creative or operator mode to create invisible protective walls
- Name them — while naming doesn’t make them invincible, it signals to other players that the stand is intentional
- Place them away from mob spawn areas — especially if you’re playing on a server
Common Mistakes to Avoid
Before you wrap up, run through this quick checklist:
- ❌ Using the wrong stone slab — must be smooth stone, nothing else
- ❌ Misaligned crafting pattern — every square placement matters
- ❌ Trying to pose without cheats enabled — commands require cheat access
- ❌ Placing on uneven surfaces — the stand can look tilted or float slightly
- ❌ Forgetting to enable arms before trying to equip hand items
Armor Stand Recipe Variations and Related Crafts
| Item | Recipe | Notes |
|---|---|---|
| Armor Stand | 6 Sticks + 1 Smooth Stone Slab | Core recipe — requires exact grid placement |
| Smooth Stone Slab | 3 Smooth Stone in a row | Must smelt cobblestone twice |
| Sticks | 2 Wooden Planks (vertical stack) | Any wood type works |
| Name Tag | Not craftable | Found in chests, fishing, or trading |
| Anvil | 3 Blocks of Iron + 4 Iron Ingots | Used to rename name tags |
Java Edition vs. Bedrock Edition — What’s Different?
Since this guide focuses on Minecraft PC (Java Edition), it helps to understand what separates the two versions when it comes to armor stands.
Java Edition Features (PC)
- No visible arms by default — must be enabled via command
- Full pose customization with NBT data commands
- Can carry items in both the primary hand and the off-hand
- Invisible armor stand option available
- More granular control overall
Bedrock Edition Features
- Arms are visible by default — no command needed
- Pose options available through a GUI interface, no commands required
- Slightly different visual proportions
- Limited compared to Java for advanced builds
📌 If you’re playing Minecraft on a PC through the Microsoft Store version, that’s Bedrock Edition — not Java. The crafting recipe is the same, but the customization options differ.
Frequently Asked Questions — How to Make an Armor Stand in Minecraft PC
What do I need to make an armor stand in Minecraft PC?
You need six sticks and one smooth stone slab. Arrange them in a specific pattern on a crafting table — sticks in a cross-and-corner formation with the slab at the bottom center. Both materials are easy to gather early in any survival world.
Can I make an armor stand in Minecraft PC without smooth stone?
No. The recipe specifically requires a smooth stone slab. Regular stone slabs, cobblestone slabs, and stone brick slabs will not trigger the recipe. Smelt cobblestone into stone, then smelt stone into smooth stone, then craft the slab.
How do I pose an armor stand in Minecraft PC?
Use NBT data commands via the /data merge entity command with pose parameters. Each body part accepts X, Y, and Z rotation values. You’ll need cheats enabled in your world or operator permissions on a server. Free online pose generators make this much easier than doing the math yourself.
How many armor stands can I place in Minecraft PC?
There’s no hard limit set by the game, but placing a very large number of armor stands (and entities in general) in one chunk can start affecting server or client performance. For most players building display rooms, you’ll never run into this issue.
Can armor stands hold weapons and tools in Minecraft PC?
Yes — in Java Edition, once you enable arms with the {ShowArms:1b} tag, your armor stand can hold any item in its main hand and off-hand slot. Swords, axes, bows, crossbows, shields, lanterns — all fair game.
Do armor stands despawn in Minecraft PC?
No. Unlike mobs, armor stands are persistent entities. They will stay in place indefinitely unless a player destroys them, an explosion hits them, or an admin removes them with a command. Naming them doesn’t affect despawn behavior because they don’t despawn anyway.
How do I remove armor from an armor stand in Minecraft PC?
Right-click the armor stand while holding nothing in your main hand. The item in whichever slot your cursor is near will transfer to your inventory. You can also right-click while holding a different armor piece to swap them out directly.
Can I put an armor stand in a chest or ship it in Minecraft?
Yes — once you break an armor stand by attacking it or using commands, it drops as an item and can be picked up, stored in chests, traded, or moved anywhere you like. Breaking a stand with armor on it drops both the stand and all equipped items.
Conclusion
Building an armor stand in Minecraft PC is one of those small tasks that pays off far beyond how simple it sounds. Six sticks, one smooth stone slab, and a crafting table — that’s the whole material list. But what you do with that stand after you place it? That’s where the real creativity starts.
You’ve learned how to gather every material, follow the exact crafting pattern, equip gear, customize with commands, pose your stand, make it invisible, and protect it from damage. You’ve also seen how armor stands connect to redstone systems and how Java Edition gives you far more control than most players ever explore.
Now it’s your turn to use it.
Start with a simple display room — one stand per armor set. Label them with name tags, light them up with item frames or lanterns, and watch your base go from functional to genuinely impressive. Once that clicks, move into commands and start experimenting with poses.
Drop a screenshot of your armor stand setup in the comments — and let the community know what build you’re working on. The more creative the setup, the better.